WordPress Plugin Development
WordPress Plugin Development In Bangla Part-8: Adding CSS,JS and AJAX in WordPress Plugin

WordPress এর Theme অথবা Plugin ডেভেলপমেন্ট এর সময় , সে গুলোতে সঠিক উপায়ে CSS ,JavaScript এবং AJAX যুক্ত করা একটা গুরুত্বপূর্ণ বিষয়। আজকের পর্বে , আমরা কিভাবে WordPress প্লাগিনে CSS ,JavaScript এবং AJAX সঠিক উপায়ে যুক্ত করা যায় , তা দেখব। চলুন শুরু করা যাক।
প্লাগিনে stylesheet যুক্ত করণ:
যেকোনো থিম এবং প্লাগিন ডেভেলপমেন্ট করতে গেলে, অনেক সময় আমাদেরকে বিভিন্ন stylesheet কোড বা ফাইল যুক্ত করতে হয়। WordPress প্লাগিন অথবা থিম এ stylesheet File যুক্ত করার জন্য দুটি function ব্যবহৃত হয় , একটি হচ্ছে wp_register_style() ফাঙ্কশন আর অন্যটি হচ্ছে wp_enqueue_style() ফাঙ্কশন। আর এর মধ্যে wp_register_style() ফাঙ্কশন দিয়ে stylesheet টি কে রেজিস্টার করে রাখা হয় , যেন পরবর্তীতে wp_enqueue_style() ফাঙ্কশন সেটি ব্যবহার করতে পারে। তবে আপনি চাইলে , কোনো stylesheet রেজিস্টার না করেই wp_enqueue_style() function দিয়ে যেকোনো stylesheet কে plugin বা থিমে যুক্ত করতে পারবেন। চলুন দুটি ফাঙ্কশনের সিনটেক্স এবং ব্যবহার দেখা যাক:
Registering the CSS Files
WordPress এর Theme অথবা প্লাগিনে যেকোনো CSS stylesheets লোড করার জন্য wp_register_style() function টি ব্যবহৃত হয়।
wp_register_style() Function Syntax
1 2 3 4 5 6 7 | wp_register_style( string $handle, string|bool $src, string[] $deps = array(), string|bool|null $ver = false, media $media= 'all') |
#Parameters
- $handle (string) (Required) যেই নাম stylesheet ফাইল টি রেজিস্টার করবেন , এখানে তার একটি ইউনিক নাম দিতে হবে।
- $src (string|bool) (Required) stylesheet টির সম্পূর্ণ URL অথবা path টি এখানে হবে। আর যদি false দেওয়া হয়, তাহলে এটা অন্য stylesheet এর dependency হিসেবে ব্যবহৃত হবে।
- $deps (string[]) (Optional) যেই stylesheet টি রেজিস্টার করবেন , তার যদি কোনো dependency থাকে , তাহলে সেই dependency গুলো এরে আকারে এখানে দিতে পারবেন। তবে অবশ্যই সেই dependency গুলো আগে রেজিস্টার্ড থাকতে হবে। Default value: array()
- $ver (string|bool|null) (Optional) এখানে চাইলে যেই stylesheet টি রেজিস্টার করবেন , তার যেই ভার্সন ব্যবহার করবেন তা দিয়ে দিতে পারেন। আর যদি এখানে false দিয়ে দেওয়া হয় , তাহলে current version টি অটোমেটিক্যালি লোড হবে। আর যদি value হিসেবে null তাহলে কোনো ভার্সন যুক্ত হবেনা। Default value: false
- $media (string) (Optional) কি ধরণের media যেমন : ‘all’, ‘print’ নাকি ‘screen’এর জন্য তা এখানে বলতে পারেন। বা কোনো media query থাকলে যেমন: ‘(orientation: portrait)’ and ‘(max-width: 640px)’ এইরকম থাকলে সেটাও এখানে দিতে পারেন। Default value: ‘all’
https://blog.w3programmers.com/professional-wordpress-plugin-development-beginning-to-advance/
Removing a registered stylesheet
WordPress এর Theme অথবা প্লাগিনে যেকোনো CSS stylesheets remove করার জন্য wp_deregister_style() function টি ব্যবহৃত হয়।
Syntax
1 | wp_deregister_style( string $handle ) |
Parameters #
$handle(string) (Required): যেই stylesheet টি রিমুভ করবেন , তার নাম এখানে হবে।
নিচের উদাহরণটি দেখুনঃ
1 2 3 4 5 | add_action( 'wp_enqueue_scripts', 'remove_default_stylesheet', 20 );function remove_default_stylesheet() { wp_deregister_style( 'original-register-stylesheet-handle' ); wp_register_style( 'new-style', get_stylesheet_directory_uri() . '/new.css', false, '1.0.0' ); } |
Enqueueing the CSS Files
আপনার stylesheet file টি রেজিস্টার হয়ে যাওয়ার পর , এখন এটাকে আপনার থিম অথবা প্লাগিনের জন্য রেডি করতে হবে। অর্থাৎ, আপনার stylesheet file টিকে <head> এর মধ্যে লোড করতে হবে। আর এই কাজটি করার জন্য ওয়ার্ডপ্রেসে wp_enqueue_style() function টি ব্যবহৃত হয়।
wp_enqueue_style() Function Syntax
1 2 3 4 5 6 7 | wp_enqueue_style( string $handle, string $src = '', string[] $deps = array(), string|bool|null $ver = false, bool media $media= 'all') |
#Parameters
- $handle (string) (Required) এখানে stylesheet টির একটা ইউনিক নাম দিতে হবে। তবে যদি wp_register_style() function দিয়ে কোনো stylesheet রেজিস্টার করে রাখেন , তাহলে সেখানে অর্থাৎ wp_register_style() ফাঙ্কশনের প্রথম প্যারামিটারে যেই নাম দিয়েছেন , সেই নামটি এখানে দিতে হবে।
- $src (string|bool) (Required) stylesheet টির সম্পূর্ণ URL অথবা path টি এখানে হবে। আর যদি false দেওয়া হয়, তাহলে এটা অন্য stylesheet এর dependency হিসেবে ব্যবহৃত হবে।
- $deps (string[]) (Optional) যেই stylesheet টি রেজিস্টার করবেন , তার যদি কোনো dependency থাকে , তাহলে সেই dependency গুলো এরে আকারে এখানে দিতে পারবেন। তবে অবশ্যই সেই dependency গুলো আগে রেজিস্টার্ড থাকতে হবে। Default value: array()
- $ver (string|bool|null) (Optional) এখানে চাইলে যেই stylesheet টি রেজিস্টার করবেন , তার যেই ভার্সন ব্যবহার করবেন তা দিয়ে দিতে পারেন। আর যদি এখানে false দিয়ে দেওয়া হয় , তাহলে current version টি অটোমেটিক্যালি লোড হবে। আর যদি value হিসেবে null তাহলে কোনো ভার্সন যুক্ত হবেনা। Default value: false
- $media (string) (Optional) কি ধরণের media যেমন : ‘all’, ‘print’ নাকি ‘screen’এর জন্য তা এখানে বলতে পারেন। বা কোনো media query থাকলে যেমন: ‘(orientation: portrait)’ and ‘(max-width: 640px)’ এইরকম থাকলে সেটাও এখানে দিতে পারেন। Default value: ‘all’
উদাহরণঃ
1 2 3 4 5 6 7 8 9 | /** * Registers a stylesheet. */function wpdocs_register_plugin_styles() { wp_register_style( 'my-plugin', plugins_url( 'my-plugin/css/plugin.css' ) ); wp_enqueue_style( 'my-plugin' );}// Register style sheet.add_action( 'wp_enqueue_scripts', 'wpdocs_register_plugin_styles' ); |
Removing the previously enqueued CSS stylesheet
পূর্বে enqueu করা যেকোনো CSS stylesheet কে রিমুভ করার জন্য wp_dequeue_style() ফাঙ্কশনটি ব্যবহৃত হয়।
Syntax
1 | wp_dequeue_style( string $handle ) |
Parameters #
$handle(string) (Required): যেই stylesheet টি রিমুভ করবেন , তার নাম এখানে হবে।
নিচের উদাহরণটি দেখুনঃ
1 2 3 4 5 | add_action( 'wp_enqueue_scripts', 'remove_default_stylesheet', 20 );function remove_default_stylesheet() { wp_dequeue_style( 'original-enqueue-stylesheet-handle' ); wp_enqueue_style( 'new-style' );} |
WordPress enqueue scripts Hooks
WordPress এ যেকোনো script কে যুক্ত করার জন্য তিনটি hook রয়েছে , আর এই hook গুলো হচ্ছে :
- wp_enqueue_scripts: WordPress এর front-endএর জন্য যদি কোনো script বা CSS লোড করতে চান , তাহলে এই হুকটি ব্যবহার করতে পারবেন ।
- login_enqueue_scripts:WordPress এর login page এর জন্য যদি কোনো script বা CSS লোড করতে চান , তাহলে এই হুকটি ব্যবহার করতে পারবেন ।
- admin_enqueue_scripts:WordPress এর running admin page এর জন্য যদি কোনো script বা CSS লোড করতে চান , তাহলে এই হুকটি ব্যবহার করতে পারবেন ।
wp_enqueue_style() function ব্যবহার করে একটা Simple Comment Rating প্লাগিন
প্রথমে w3-wordPress-comments-rating/w3-wordPress-comments-rating.php file এ নিচের কোড গুলো যুক্ত করুন।
001 002 003 004 005 006 007 008 009 010 011 012 013 014 015 016 017 018 019 020 021 022 023 024 025 026 027 028 029 030 031 032 033 034 035 036 037 038 039 040 041 042 043 044 045 046 047 048 049 050 051 052 053 054 055 056 057 058 059 060 061 062 063 064 065 066 067 068 069 070 071 072 073 074 075 076 077 078 079 080 081 082 083 084 085 086 087 088 089 090 091 092 093 094 095 096 097 098 099 100 101 102 103 104 105 106 107 108 109 110 111 112 113 114 115 116 117 118 119 120 121 122 123 124 125 126 127 128 | <?php/*Plugin Name: W3 WordPress Comments RatingDescription: W3 WordPress Comments Rating SystemPlugin URI: https://github.com/w3programmers/w3-wordpress-comments-ratingVersion: 1.0.0Author: Masud AlamAuthor URI: https://blog.w3programmers.comText Domain: w3-wordpress-comments-rating*///Enqueue the plugin's styles.add_action( 'wp_enqueue_scripts', 'w3_comment_rating_styles' );function w3_comment_rating_styles() { wp_register_style( 'w3-comment-rating-styles', plugins_url( '/', __FILE__ ) . 'css/style.css' ); wp_enqueue_style( 'dashicons' ); wp_enqueue_style( 'w3-comment-rating-styles' );}//Create the rating interface.add_action( 'comment_form_logged_in_after', 'w3_comment_rating_field' );add_action( 'comment_form_after_fields', 'w3_comment_rating_field' );function w3_comment_rating_field () { ?> <label for="rating">Rating<span class="required">*</span></label> <fieldset class="comments-rating"> <span class="rating-container"> <?php for ( $i = 5; $i >= 1; $i-- ) : ?> <input type="radio" id="rating-<?php echo esc_attr( $i ); ?>" name="rating" value="<?php echo esc_attr( $i ); ?>" /><label for="rating-<?php echo esc_attr( $i ); ?>"><?php echo esc_html( $i ); ?></label> <?php endfor; ?> <input type="radio" id="rating-0" class="star-cb-clear" name="rating" value="0" /><label for="rating-0">0</label> </span> </fieldset> <?php}//Save the rating submitted by the user.add_action( 'comment_post', 'w3_comment_rating_save' );function w3_comment_rating_save( $comment_id ) { if ( ( isset( $_POST['rating'] ) ) && ( '' !== $_POST['rating'] ) ) $rating = intval( $_POST['rating'] ); add_comment_meta( $comment_id, 'rating', $rating );}//Make the rating required.add_filter( 'preprocess_comment', 'w3_comment_rating_require' );function w3_comment_rating_require( $commentdata ) { if ( ! is_admin() && ( ! isset( $_POST['rating'] ) || 0 === intval( $_POST['rating'] ) ) ) wp_die( __( 'Error: You did not add a rating. Hit the Back button on your Web browser and resubmit your comment with a rating.' ) ); return $commentdata;}//Display the rating on a submitted comment.add_filter( 'comment_text', 'w3_comment_rating_display');function w3_comment_rating_display( $comment_text ){ if ( $rating = get_comment_meta( get_comment_ID(), 'rating', true ) ) { $stars = '<p class="stars">'; for ( $i = 1; $i <= $rating; $i++ ) { $stars .= '<span class="dashicons dashicons-star-filled"></span>'; } $stars .= '</p>'; $comment_text = $comment_text . $stars; return $comment_text; } else { return $comment_text; }}//Get the average rating of a post.function w3_comment_rating_get_average( $id ) { $comments = get_approved_comments( $id ); if ( $comments ) { $i = 0; $total = 0; foreach( $comments as $comment ){ $rate = get_comment_meta( $comment->comment_ID, 'rating', true ); if( isset( $rate ) && '' !== $rate ) { $i++; $total += $rate; } } if ( 0 === $i ) { return false; } else { return round( $total / $i, 1 ); } } else { return false; }}//Display the average rating above the content.add_filter( 'the_content', 'w3_comment_rating_display_average' );function w3_comment_rating_display_average( $content ) { global $post; if ( false === w3_comment_rating_get_average( $post->ID ) ) { return $content; } $stars = ''; $average = w3_comment_rating_get_average( $post->ID ); for ( $i = 1; $i <= $average + 1; $i++ ) { $width = intval( $i - $average > 0 ? 20 - ( ( $i - $average ) * 20 ) : 20 ); if ( 0 === $width ) { continue; } $stars .= '<span style="overflow:hidden; width:' . $width . 'px" class="dashicons dashicons-star-filled"></span>'; if ( $i - $average > 0 ) { $stars .= '<span style="overflow:hidden; position:relative; left:-' . $width .'px;" class="dashicons dashicons-star-empty"></span>'; } } $custom_content = '<p class="average-rating">This post\'s average rating is: ' . $average .' ' . $stars .'</p>'; $custom_content .= $content; return $custom_content;} |
ব্যাখ্যা:
এখন আমরা w3-wordPress-comments-rating.php file এর কোডগুলো একটু ব্যাখ্যা করব।
- লাইন নম্বর ১৩-২০ এ আমাদের css কে wp_register_style() এবং wp_enqueue_style() function দুটির মাধ্যমে আমাদের প্লাগিনে যুক্ত করি।
- লাইন নম্বর ২৩ এবং ২৪ এ ওয়ার্ডপ্রেসের দুটি বিল্টইন action hook যথাক্রমে comment_form_logged_in_after (লগিনের পর কাজ করবে ) এবং comment_form_after_fields (লগইন ছাড়াই কাজ করবে ) এ rating interface ডিজাইন করার জন্য w3_comment_rating_field() function টি assign করি।
- লাইন নম্বর ২৫-৩৭ এ w3_comment_rating_field() ফাঙ্কশনে rating interface ডিজাইন করার কাজটি সম্পর্ন করি।
- লাইন নম্বর ৪০ থেকে ৪৫ এ কমেন্ট এর রেটিং কে w3_comment_rating_save() function দিয়ে add_comment_meta() ফাঙ্কশনের মাধ্যমে wp_commentmeta table এ সংরক্ষণের ব্যবস্থা করি।
- লাইন নম্বর ৪৮ থেকে ৫৩ তে user কে রেটিং দিতে বাধ্য করার কাজটি করি।
- লাইন নম্বর ৫৬ থেকে ৭০ এ user এর রেটিং কে comment এর নিচে প্রদর্শনের ব্যবস্থা করি।
- লাইন নম্বর ৭২ -৯৫ এ comment এর সবগুলো rating এর w3_comment_rating_get_average() ফাঙ্কশনের মাধ্যমে average ক্যালকুলেশন করি।
- সর্বশেষ লাইন নম্বর ৯৮ থেকে ১২৮ এর মধ্যে w3_comment_rating_display_average() ফাঙ্কশনে w3_comment_rating_get_average() ফাঙ্কশন ব্যবহার করে , কনটেন্ট এর শুরুতে average rating প্রদর্শনের ব্যবস্থা করি।
এবার w3-wordPress-comments-rating/style.css file এ নিচের কোড গুলো যুক্ত করুন।
01 02 03 04 05 06 07 08 09 10 11 12 13 14 15 16 17 18 19 20 21 22 23 24 25 26 27 28 29 30 31 32 33 34 35 36 37 38 39 40 41 42 43 44 45 46 47 48 49 50 51 52 53 54 55 56 57 58 59 60 61 62 63 64 65 66 67 68 69 70 71 72 73 74 75 76 77 78 79 80 81 82 83 | .comments-rating { border: none; padding: 0; margin-left: 0;}.comments-rating label { display: inline-block;}.rating-container { /* remove inline-block whitespace */ font-size: 0; /* flip the order so we can use the + and ~ combinators */ unicode-bidi: bidi-override; direction: rtl;}.rating-container * { font-size: 1.4rem;}.rating-container > input { display: none;}.rating-container > input + label { /* only enough room for the star */ font-family: 'dashicons'; display: inline-block; overflow: hidden; text-indent: 9999px; width: 1em; white-space: nowrap; cursor: pointer; margin: 0;}.rating-container > input + label:before { display: inline-block; text-indent: -9999px; content: "\f154"; color: #888;}.rating-container > input:checked ~ label:before,.rating-container > input + label:hover ~ label:before,.rating-container > input + label:hover:before { content: "\f155"; color: #e52; text-shadow: 0 0 1px #333;}.rating-container > .star-cb-clear + label { text-indent: -9999px; width: .5em; margin-left: -.5em;}.rating-container > .star-cb-clear + label:before { width: .5em;}.rating-container:hover > input + label:before { content: "\f154"; color: #888; text-shadow: none;}.rating-container:hover > input + label:hover ~ label:before,.rating-container:hover > input + label:hover:before { content: "\f155"; color: #e52; text-shadow: 0 0 1px #333;}.comment-respond .rating-container > .star-cb-clear + label, .comment-respond .rating-container > input + label:before { text-indent: 9999px;}.comment-respond .rating-container > input + label { text-indent: -9999px;} |
এখন যদি আপনি প্লাগিন টি এক্টিভেট করেন , তাহলে নিচের মতো ফলাফল দেখতে পাবেন।
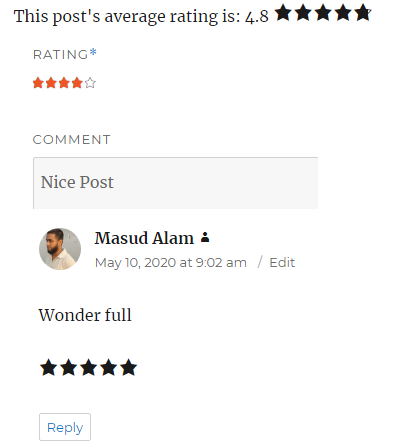
https://blog.w3programmers.com/professional-wordpress-plugin-development-beginning-to-advance/
প্লাগিনে JavaScript যুক্ত করণ:
WordPress প্লাগিন অথবা থিম এ JavaScript যুক্ত করার জন্য দুটি function ব্যবহৃত হয় , একটি হচ্ছে wp_register_script() ফাঙ্কশন আর অন্যটি হচ্ছে wp_enqueue_script() ফাঙ্কশন। আর এর মধ্যে wp_register_script() ফাঙ্কশন দিয়ে script টি কে রেজিস্টার করে রাখা হয় , যেন পরবর্তীতে wp_enqueue_script() ফাঙ্কশন সেটি ব্যবহার করতে পারে। তবে আপনি চাইলে , কোনো script রেজিস্টার না করেই wp_enqueue_script() function দিয়ে যেকোনো script কে plugin বা থিমে যুক্ত করতে পারবেন। চলুন দুটি ফাঙ্কশনের সিনটেক্স এবং ব্যবহার দেখা যাক:
wp_register_script() Function Syntax
1 2 3 4 5 6 7 | wp_register_script( string $handle, string|bool $src, string[] $deps = array(), string|bool|null $ver = false, bool $in_footer = false ) |
#Parameters
- $handle (string) (Required) যেই নাম script ফাইল টি রেজিস্টার করবেন , এখানে তার একটি ইউনিক নাম দিতে হবে।
- $src (string|bool) (Required) script টির সম্পূর্ণ URL অথবা path টি এখানে হবে। আর যদি false দেওয়া হয়, তাহলে এটা অন্য script এর dependency হিসেবে ব্যবহৃত হবে।
- $deps (string[]) (Optional) যেই script টি রেজিস্টার করবেন , তার যদি কোনো dependency থাকে , তাহলে সেই dependency গুলো এরে আকারে এখানে দিতে পারবেন। তবে অবশ্যই সেই dependency গুলো আগে রেজিস্টার্ড থাকতে হবে। Default value: array()
- $ver (string|bool|null) (Optional) এখানে চাইলে যেই script টি রেজিস্টার করবেন , তার যেই ভার্সন ব্যবহার করবেন তা দিয়ে দিতে পারেন। আর যদি এখানে false দিয়ে দেওয়া হয় , তাহলে current version টি অটোমেটিক্যালি লোড হবে। আর যদি value হিসেবে null তাহলে কোনো ভার্সন যুক্ত হবেনা। Default value: false
- $in_footer (bool) (Optional) যদি script টি tag এর মধ্যের পরিবর্তে ট্যাগ এর উপরে যুক্ত করতে চান , তাহলে এখানে true করে দিতে হবে। Default value: false
উদাহরণঃ
01 02 03 04 05 06 07 08 09 10 | <?phpwp_register_script( 'someScript-js', 'https://script-domain.com/someScript.js' , '', '', true );wp_register_script( 'first', plugins_url() . 'js/first.js' );wp_register_script(' myfirstscript', plugins_url() .'/myscript.js', // array ('jquery', 'jquery-ui'), //depends on these, however, they are registered by core already, so no need to enqueue them. false, false);?> |
wp_enqueue_script() Function Syntax
1 2 3 4 5 6 7 | wp_enqueue_script( string $handle, string $src = '', string[] $deps = array(), string|bool|null $ver = false, bool $in_footer = false ) |
#Parameters
- $handle (string) (Required) এখানে script টির একটা ইউনিক নাম দিতে হবে। তবে যদি wp_register_script() function দিয়ে কোনো script রেজিস্টার করে রাখেন , তাহলে সেখানে অর্থাৎ wp_register_script() ফাঙ্কশনের প্রথম প্যারামিটারে যেই নাম দিয়েছেন , সেই নামটি এখানে দিতে হবে।
- $src (string|bool) (Required) script টির সম্পূর্ণ URL অথবা path টি এখানে হবে। আর যদি false দেওয়া হয়, তাহলে এটা অন্য script এর dependency হিসেবে ব্যবহৃত হবে।
- $deps (string[]) (Optional) যেই script টি রেজিস্টার করবেন , তার যদি কোনো dependency থাকে , তাহলে সেই dependency গুলো এরে আকারে এখানে দিতে পারবেন। তবে অবশ্যই সেই dependency গুলো আগে রেজিস্টার্ড থাকতে হবে। Default value: array()
- $ver (string|bool|null) (Optional) এখানে চাইলে যেই script টি রেজিস্টার করবেন , তার যেই ভার্সন ব্যবহার করবেন তা দিয়ে দিতে পারেন। আর যদি এখানে false দিয়ে দেওয়া হয় , তাহলে current version টি অটোমেটিক্যালি লোড হবে। আর যদি value হিসেবে null তাহলে কোনো ভার্সন যুক্ত হবেনা। Default value: false
- $in_footer (bool) (Optional) যদি script টি tag এর মধ্যের পরিবর্তে ট্যাগ এর উপরে যুক্ত করতে চান , তাহলে এখানে true করে দিতে হবে। Default value: false
উদাহরণঃ
1 2 | wp_register_script( 'someScript-js', 'https://script-domain.com/someScript.js' , '', '', true );wp_enqueue_script( 'someScript-js' ); |
উদাহরণঃ
1 2 3 4 5 6 7 8 9 | add_action("wp_enqueue_scripts", "myscripts");function myscripts() { wp_register_script('myfirstscript', plugins_url() .'/myscript.js', // array ('jquery', 'jquery-ui'), //depends on these, however, they are registered by core already, so no need to enqueue them. false, false); wp_enqueue_script('myfirstscript'); } |
আবার script এর যদি dependency থাকে তাহলে , কোডটি এইভাবে হবে।
1 2 3 4 5 6 | function my_enqueue_scripts(){ wp_register_script( 'first', plugins_url() . 'js/first.js' ); wp_enqueue_script( 'second', plugins_url() . 'js/second.js', array( 'first' ) );}add_action( 'wp_enqueue_scripts', 'my_enqueue_scripts' ); |
dependency যুক্ত আরো একটা উদাহরণ দেখুন :
01 02 03 04 05 06 07 08 09 10 11 12 13 | function myscripts() { //get some external script that is needed for this script wp_enqueue_script('jquery-ui', 'http://ajax.googleapis.com/ajax/libs/jqueryui/1.9.1/jquery-ui.min.js'); $script = plugins_url() . '/library/myscript.js'; wp_register_script('myfirstscript', $script, array ('jquery', 'jquery-ui'), false, false); //always enqueue the script after registering or nothing will happen wp_enqueue_script('fullpage-slimscroll'); }add_action("wp_enqueue_scripts", "myscripts"); |
যেইসব জাভাস্ক্রিপ্ট ফাইল বা লাইব্রেরি সরাসরি enqueue বা register করা উচিত না।
WordPress Installatin কালীন অনেকগুলো JavaScript File এবং Library গুলো Bundleআকারে install হয়ে যায় , তাই সে গুলো আবার ইনস্টল বা লোড করা যেমন ভুল, একইভাবে পারফরম্যান্স এর জন্য খারাপ হবে। তাই সেই গুলো আমরা নতুন করে যুক্ত করবনা। ওয়ার্ডপ্রেসের বিল্টইন জাভাস্ক্রিপ্ট File লাইব্রেরি গুলোর লিস্ট পাবেন , এখানে। একই সাথে কোন script এর dependency কি, তা এখানে দেখতে পাবেন।
একটা Simple জাভাস্ক্রিপ্ট যুক্ত করার প্লাগিন
এখন আমরা এমন একটা Plugin তৈরি করব , যার কাজ হবে, শুধু কয়েকটা JavaScript File তাদের dependency সহ আমাদের ওয়ার্ডপ্রেসে যুক্ত করবে। আমরা আমাদের প্লাগিনটির নাম দিলাম “W3 Add JS to a Plugin” চলুন শুরু করা যাক।
প্রথমে প্লাগিনটির ফোল্ডার স্ট্রাকচার এর সাথে পরিচয় হয়ে নেয়া যাক :
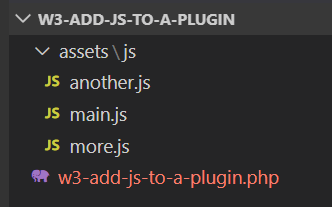
এবার আপনার প্লাগিন ফোল্ডারে assets\js ফোল্ডারে যথাক্রমে নিম্নোক্ত তিনটি js file কোড গুলো সহ তৈরি করে রাখুন।
main.js
1 2 3 | ;(function($){ alert('Hello From Main.js');})(jQuery); |
another.js
1 2 3 | ;(function($){ alert('Hello From Another.js');})(jQuery); |
more.js
1 2 3 | ;(function($){ alert('Hello From More.js');})(jQuery); |
এবার আমাদের মূল প্লাগিন w3-add-js-to-a-plugin.php ফাইলের কোড গুলো লক্ষ্য করুন :
01 02 03 04 05 06 07 08 09 10 11 12 13 14 15 16 17 18 19 20 21 22 23 24 25 26 27 28 29 30 31 32 | <?php/*Plugin Name: W3 Add JS to a PluginDescription: Add JS Files and Liraries to PluginPlugin URI: https://github.com/w3programmers/w3-add-js-to-a-pluginVersion: 1.0.0Author: Masud AlamAuthor URI: https://blog.w3programmers.comText Domain: w3-add-js-to-a-plugin*/define( "W3_ASSETS_DIR", plugin_dir_url( __FILE__ ) . "assets/" );add_action( 'wp_enqueue_scripts','load_front_assets');function load_front_assets() { wp_register_script( 'w3-main-js',W3_ASSETS_DIR . "/js/main.js", array( 'jquery', 'w3-another-js' ), '1.0', true ); wp_enqueue_script('w3-main-js'); wp_register_script( 'w3-another-js', W3_ASSETS_DIR . "/js/another.js", array( 'jquery', 'w3-more-js' ), '1.0', true ); wp_enqueue_script('w3-another-js'); wp_register_script( 'w3-more-js', W3_ASSETS_DIR . "/js/more.js", array( 'jquery' ), '1.0', true ); wp_enqueue_script('w3-more-js');} |
ব্যাখ্যা:
- প্রথমে লাইন নম্বর ১২ তে লক্ষ্য করুন , আমরা আমাদের assets file গুলোর path কে একটা constant এর মধ্যে ডিফাইন করে রেখেছি।
- লাইন নম্বর ১৩ তে আমরা add_action() hook declaration ফাঙ্কশনের মাধ্যমে wp_enqueue_scripts front-end Hook এর জন্য javascript file গুলো লোড করার জন্য load_front_assets নামে একটা function ঘোষণা করেছি।
- সর্বশেষ , লাইন নম্বর ১৬ থেকে ৩২ এর মধ্যে আমরা load_front_assets() custom ফাঙ্কশনে wp_register_script এবং wp_enqueue_script এর সাহায্যে একে একে সবগুলো JavaScript ফাইল গুলো আমাদের ফ্রন্টএন্ড এর জন্য লোড করেছি।
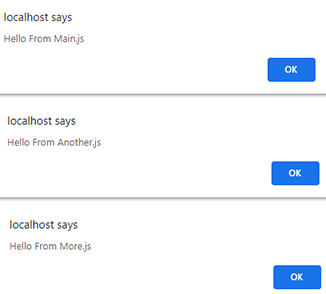
এখন যদি আপনি প্লাগিনটি এক্টিভেট করেন , এবং আপনার ওয়ার্ডপ্রেস ফ্রন্টএন্ড এ একটা রিফ্রেশ দেন , তাহলে নিচের মতো alert গুলো একটার পর একটা দেখতে পাবেন।
PHP বা Server থেকে যেকোনো data JavaScript এ পাঠানো
WordPress Plugin অথবা Theme এ PHP বা Server থেকে যেকোনো data JavaScript এ পাঠানোর জন্য wp_localize_script() function টি ব্যবহৃত হয়।
wp_localize_script() Function Syntax
1 2 3 4 5 | wp_localize_script( string $handle, string $object_name, array $l10n) |
Parameters #
- $handle (string) (Required) wp_enqueue_script() ফাঙ্কশনে ব্যবহৃত Script handle এর নাম দিবেন।
- $object_name (string) (Required) এখানে আপনার JavaScript এর অবজেক্টির নাম হবে। আর যেহেতু এটি সরাসরি পাস হয়, তাই অবশ্যই একটা ভ্যালিড JS variable হতে হবে।
- $l10n (array) (Required) যেই ডাটা টি পাঠাবেন , তা এখানে দিবেন , সেটা একটা single অথবা multi-dimensional array হতে পারে।
এবার চলুন আমাদের “W3 Add JS to a Plugin” এ wp_localize_script() ফাঙ্কশন টি ব্যবহার করে Server থেকে JavaScript এ ডাটা পাঠানোর কাজটি করব।
https://blog.w3programmers.com/professional-wordpress-plugin-development-beginning-to-advance/
01 02 03 04 05 06 07 08 09 10 11 12 13 14 15 16 17 18 19 20 21 22 23 24 25 26 27 28 29 30 31 32 33 34 35 36 37 38 39 40 | <?php/*Plugin Name: W3 Add JS to a PluginDescription: Add JS Files and Liraries to PluginPlugin URI: https://github.com/w3programmers/w3-add-js-to-a-pluginVersion: 1.0.0Author: Masud AlamAuthor URI: https://blog.w3programmers.comText Domain: w3-add-js-to-a-plugin*/define( "W3_ASSETS_DIR", plugin_dir_url( __FILE__ ) . "assets/" );add_action( 'wp_enqueue_scripts','load_front_assets');function load_front_assets() { wp_register_script( 'w3-main-js',W3_ASSETS_DIR . "/js/main.js", array( 'jquery', 'w3-another-js' ), '1.0', true ); wp_enqueue_script('w3-main-js'); wp_localize_script('w3-main-js', 'w3_script_vars', array( 'message' => __("Hey! I'm from main.js!",'w3-main') )); wp_register_script( 'w3-another-js', W3_ASSETS_DIR . "/js/another.js", array( 'jquery', 'w3-more-js' ), '1.0', true ); wp_enqueue_script('w3-another-js'); wp_localize_script('w3-another-js', 'w3_script_vars', array( 'message' => __("Hey! I'm from Another.js!",'w3-another') )); wp_register_script( 'w3-more-js', W3_ASSETS_DIR . "/js/more.js", array( 'jquery' ), '1.0', true ); wp_enqueue_script('w3-more-js'); wp_localize_script('w3-more-js', 'w3_script_vars', array( 'message' => __("Hey! I'm from More.js!",'w3-more') ));} |
এবার আপনার প্লাগিন ফোল্ডারে assets\js ফোল্ডারে যথাক্রমে নিম্নোক্ত তিনটি js file এর কোড গুলোকে আপডেট করে নিন।
main.js
1 2 3 | ;(function($){ alert(w3_script_vars.message);})(jQuery); |
another.js
1 2 3 | ;(function($){ alert(w3_script_vars.message);})(jQuery); |
more.js
1 2 3 | ;(function($){ alert(w3_script_vars.message);})(jQuery); |
ব্যাখ্যা:
- লাইন নম্বর ২২,৩১ এবং ৩৭ এ লক্ষ্য করুন , wp_localize_script() ফাঙ্কশনে প্রথম প্যারামিটার হিসেবে wp_enqueue_script() ফাঙ্কশনে ব্যবহৃত ইউনিক script handler এর নামটি দিয়েছি। আর দ্বিতীয় প্যারামিটার হিসেবে w3_script_vars নামে একটা জাভাস্ক্রিপ্ট অবজেক্ট এর নাম দিয়েছি। এবং তৃতীয় প্যারামিটার হিসেবে যেই ভ্যালু যাবে, সেটি দিয়েছি।
- তারপর প্রত্যেক JS ফাইলে ২ নম্বর লাইনে , plugin php file থেকে পাঠানো object এবং তার property এর value রিসিভ করেছি।
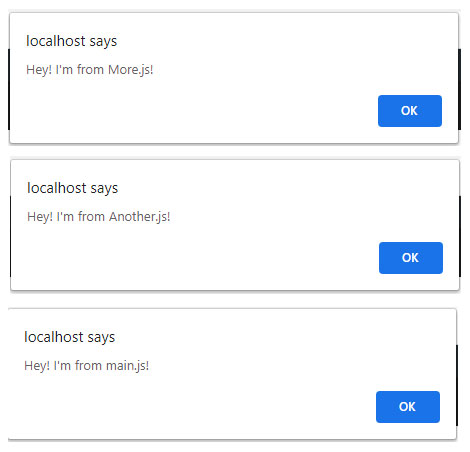
এখন যদি আপনি প্লাগিনটি এক্টিভেট করেন , এবং আপনার ওয়ার্ডপ্রেস ফ্রন্টএন্ড এ একটা রিফ্রেশ দেন , তাহলে নিচের মতো alert গুলো একটার পর একটা দেখতে পাবেন।
প্লাগিনে AJAX যুক্ত করণ:
আমরা জানি , AJAX হচ্ছে, HTML, CSS এবং JavaScript সমন্বয়ে কিছু ফাঙ্কশনালিটি , যা দিয়ে আপনি page reload ছাড়াই server এ ডাটা সেন্ড এবং রিসিভ করতে পারবেন। আর ওয়ার্ডপ্রেস ajax নিয়ে কাজ করার জন্য, তার ব্যাক এন্ডে অর্থাৎ wp-admin এ আমাদের জন্য ajax ফাঙ্কশনালিটি যুক্ত করে রেখেছে। আমাদেরকে যা করতে হবে তা হ’ল ajax এর জন্য তৈরি ফাংশনগুলি ব্যবহার করা। ajax কোড শুরু করার আগে WordPress এ AJAX কিভাবে কাজ করে ,প্রথমে তা দেখি।
WordPress এ প্রতিটি AJAX request আপনাকে wp_localize_script() function এর মাধ্যমে ওয়ার্ডপ্রেসের wp-admin ফোল্ডারে অবস্থিত admin-ajax.php ফাইলে পাঠাতে হবে। । আপনি যখন কোনো একটি ajax request পাঠাবেন , তখন সাথে সাথে admin-ajax.php ফাইলটি আমাদের জন্য দুটি action hook তৈরি করে। এর মধ্যে একটি হচ্ছে হচ্ছে “wp_ajax_{$_REQUEST[‘action’]}” আর অন্যটি হচ্ছে “wp_ajax_nopriv_{$_REQUEST[‘action’]}” , এর মধ্যে “wp_ajax_{$_REQUEST[‘action’]}” hook টি ব্যবহৃত হয় Logged In ইউজারদের জন্য, আর “wp_ajax_nopriv_{$_REQUEST[‘action’]}” Hook টি Logged Out ইউজারদের জন্য ব্যবহৃত হয়।
wp_localize_script() ফাঙ্কশন দিয়ে WordPress এর ajax request টি অনেকটা নিচের মতো হবে।
1 2 3 4 5 6 7 8 | wp_localize_script( 'ajax-script', 'ajax_object', array( 'ajax_url' => admin_url( 'admin-ajax.php' ), 'name' => "Masud Alam", 'age'=>35 )); |
এবার আপনাকে wp_ajax_{$_REQUEST[‘action’]} action হুকটি ব্যবহার করে একটা php ফাঙ্কশনের মাধ্যমে , ajax received data গুলো process করতে হবে। অনেকটা নিচের মতো :
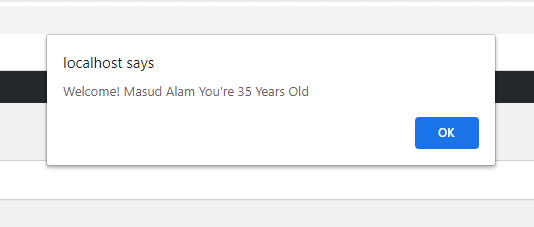
01 02 03 04 05 06 07 08 09 10 | add_action("wp_ajax_{$_REQUEST['action']}", 'receive_data' );function receive_data() { $name= $_POST['name']; $age= $_POST['age']; echo "Welcome! ".$name." You're ".$age." Years Old"; wp_die(); // this is required to terminate immediately and return a proper response} |
AJAX ব্যবহার করে একটা plugin তৈরি :
01 02 03 04 05 06 07 08 09 10 11 12 13 14 15 16 17 18 19 20 21 22 23 24 25 26 27 28 29 30 31 32 33 34 35 36 37 38 39 40 41 42 43 44 | <?php/*Plugin Name: W3 Demo Ajax PluginDescription: An Example of AJAX in WordPress PluginPlugin URI: https://github.com/w3programmers/w3-demo-ajaxVersion: 1.0.0Author: Masud AlamAuthor URI: https://blog.w3programmers.comText Domain: w3-demo-ajax*/add_action( 'admin_enqueue_scripts', 'my_enqueue' );function my_enqueue() { wp_register_script( 'ajax-script', plugins_url( '/js/script.js', __FILE__ ), array('jquery') ); wp_enqueue_script('ajax-script'); // in JavaScript, object properties are accessed as ajax_object.ajax_url, ajax_object.name wp_localize_script( 'ajax-script', 'ajax_object', array( 'ajax_url' => admin_url( 'admin-ajax.php' ), 'name' => "Masud Alam", 'age'=>35 )); }add_action("wp_ajax_{$_REQUEST['action']}", 'receive_data' );function receive_data() { $name= $_POST['name']; $age= $_POST['age']; echo "Welcome! ".$name." You're ".$age." Years Old"; wp_die(); // this is required to terminate immediately and return a proper response} |
এবার আপনার plugin ফোল্ডারের মধ্যে , js/script.js ফাইলে নিচের কোডগুলো লিখুন।
01 02 03 04 05 06 07 08 09 10 11 | jQuery(document).ready(function($) { var data = { 'action': 'send_data', 'name': ajax_object.name, // We pass php values differently! 'age' :ajax_object.age }; // We can also pass the url value separately from ajaxurl for front end AJAX implementations jQuery.post(ajax_object.ajax_url, data, function(response) { alert(response); });}); |
এখন যদি আপনি প্লাগিনটি activate করেন , তাহলে আপনার admin panel এ নিচের মতো রেজাল্ট দেখতে পাবেন।
Masud Alam
আমি মাসুদ আলম, বাংলাদেশের ৩৬ তম Zend Certified Engineer । ২০০৯ সালে কম্পিউটার সাইন্স থেকে বেচেলর ডিগ্রী অর্জন করি। দীর্ঘ ১৫ বছর আমি Winux Soft, SSL Wireless, IBCS-PRIMAX, Max Group, Canadian International Development Agency (CIDA), Care Bangladesh, World Vision, Hellen Keller, Amarbebsha Ltd সহ বিভিন্ন দেশি বিদেশী কোম্পানিতে ডেটা সাইন্স, মেশিন লার্নিং, বিগ ডেটা, ওয়েব ডেভেলপমেন্ট এবং সফটওয়্যার ডেভেলপমেন্ট এর উপর বিভিন্ন লিডিং পজিশন এ চাকরি এবং প্রজেক্ট লিড করি। এছাড়াও বাংলাদেশের ১৮৫ জন জেন্ড সার্টিফাইড ইঞ্জিনিয়ার এর মধ্যে ১২০ এরও অধিক ছাত্র আমার হাতে জেন্ড সার্টিফাইড ইঞ্জিনিয়ার হয়েছেন। বর্তমানে w3programmers ট্রেনিং ইনস্টিটিউট এ PHP এর উপর Professional এবং Advance Zend Certified PHP -8.2 Engineering, Laravel Mastering Course with ReactJS, Python Beginning To Advance with Blockchain, Machine Learning and Data Science, Professional WordPress Plugin Development Beginning to Advance কোর্স করাই। আর অবসর সময়ে w3programmers.com এ ওয়েব টেকনোলজি নিয়ে লেখালেখি করি।