Laravel Framework Basics
Laravel Framework Basics পর্ব-১১ : Laravel Blade Directives
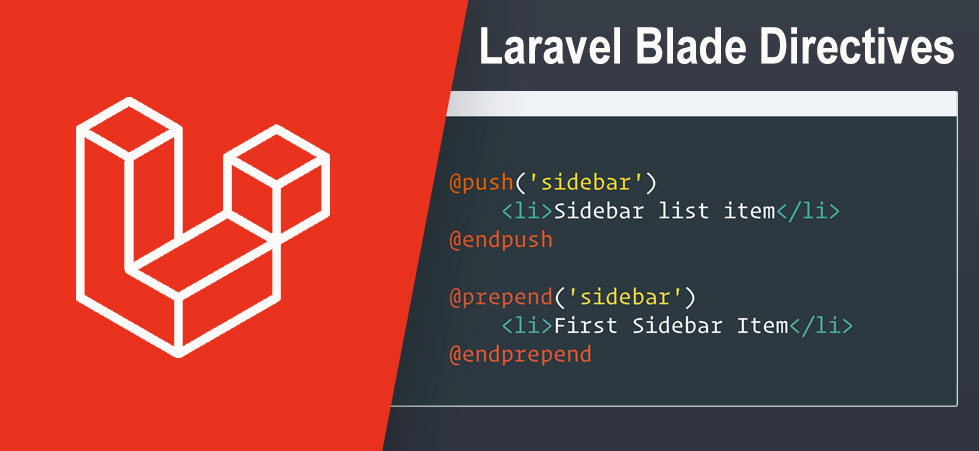
Laravel Blade Directives
Laravel Framework এ Blade directives গুলো template inheritance এবং ডেটা প্রদর্শনের পাশাপাশি, Laravel Blade সাধারণ PHP control structure গুলোর জন্য একটি সুবিধাজনক শর্টকাটও প্রদান করে, যেমন conditional statement গুলো এবং loop গুলো। এই শর্টকাটগুলি PHP control structure গুলির সাথে কাজ করার একটি খুবই স্বচ্ছ এবং সহজ উপায় প্রদান করে।
If Statements
আপনি @if, @elseif, @else, এবং @endif directive গুলো ব্যবহার করে if statement গুলো তৈরি করতে পারেন।
@if (count($records) === 1)
    I have one record!
@elseif (count($records) > 1)
    I have multiple records!
@else
    I don't have any records!
@endif
সুবিধার জন্য, Blade একটি @unless directive ও প্রদান করে:
@unless (Auth::check())
    You are not signed in.
@endunless
এছাড়াও উপরে আলোচনা করা conditional directive গুলো ছাড়াও, @isset এবং @empty Laravel Blade directive গুলো তাদের নিজ নিজ PHP ফাংশনের জন্য সুবিধাজনক শর্টকাট হিসাবে ব্যবহার করা যেতে পারে:
@isset($records)
    // $records is defined and is not null...
@endisset

@empty($records)
    // $records is "empty"...
@endempty
Laravel Blade Authentication Directives
কারেন্ট ইউজার অথেন্টিকেটেড বা গেস্ট কিনা তা দ্রুত নির্ধারণ করতে @auth এবং @guest directive গুলো ব্যবহার করা যেতে পারে:
@auth
    // The user is authenticated...
@endauth

@guest
    // The user is not authenticated...
@endguest
যদি প্রয়োজন হয়, আপনি চাইলে authentication guard নির্দিষ্ট করতে পারেন যা @auth এবং @guest directive গুলো ব্যবহার করার সময় পরীক্ষা করে।
@auth('admin')
    // The user is authenticated...
@endauth

@guest('admin')
    // The user is not authenticated...
@endguest
Laravel Blade Environment Directives
আপনি @production directive ব্যবহার করে আপনার application টি production environment এ চলছে কিনা তা পরীক্ষা করতে পারেন:
@production
    // Production specific content...
@endproduction
অথবা, আপনি চাইলে @env directive ব্যবহার করে আপনার application টি একটি নির্দিষ্ট environment এ চলছে কিনা তা চেক করতে পারেন :
@env('staging')
    // The application is running in "staging"...
@endenv

@env(['staging', 'production'])
    // The application is running in "staging" or "production"...
@endenv
Laravel Blade Section Directives
আপনি @hasSection directive ব্যবহার করে একটি template inheritance section এ content আছে কিনা তা নির্ধারণ করতে পারেন:
@hasSection('navigation')
    <div class="pull-right">
        @yield('navigation')
    </div>

    <div class="clearfix"></div>
@endif
একটি বিভাগে content নেই কিনা তা নির্ধারণ করতে আপনি sectionMissing directive ব্যবহার করতে পারেন:
@sectionMissing('navigation')
    <div class="pull-right">
        @include('default-navigation')
    </div>
@endif
Laravel Blade Directive Switch Statements
Laravel Blade এ @switch, @case, @break, @default এবং @endswitch directive গুলো ব্যবহার করে Switch statement গুলো তৈরি করা যেতে পারে:
@switch($i)
    @case(1)
        First case...
        @break

    @case(2)
        Second case...
        @break

    @default
        Default case...
@endswitch
Laravel Blade Directive Loops
conditional statement গুলো ছাড়াও, Laravel Blade এ PHP এর loop structure গুলো নিয়ে কাজ করার জন্য সহজ Laravel Blade directives গুলো প্রদান করে।
@for ($i = 0; $i < 10; $i++)
    The current value is {{ $i }}
@endfor

@foreach ($users as $user)
    <p>This is user {{ $user->id }}</p>
@endforeach

@forelse ($users as $user)
    <li>{{ $user->name }}</li>
@empty
    <p>No users</p>
@endforelse

@while (true)
    <p>I'm looping forever.</p>
@endwhile
loop গুলো ব্যবহার করার সময় আপনি @continue Laravel Blade Directives এবং @break Laravel Blade directives গুলো ব্যবহার করে current iteration এড়িয়ে যেতে পারেন বা লুপটি শেষ করতে পারেন:
@foreach ($users as $user)
    @if ($user->type == 1)
        @continue
    @endif

    <li>{{ $user->name }}</li>

    @if ($user->number == 5)
        @break
    @endif
@endforeach
আপনি directive ঘোষণার মধ্যে continuation বা break শর্ত অন্তর্ভুক্ত করতে পারেন:
@foreach ($users as $user)
    @continue($user->type == 1)

    <li>{{ $user->name }}</li>

    @break($user->number == 5)
@endforeach
Laravel Blade Directive $loop Variable
একটি foreach লুপের মাধ্যমে iterating করার সময়, একটি $loop নামে variable আপনার লুপের ভিতরে তৈরি হবে। এই variable টি প্রয়োজনীয় কিছু তথ্যের access প্রদান করে যেমন current loop index এবং এটি লুপের মাধ্যমে first বা last iteration কিনা:
@foreach ($users as $user)
    @if ($loop->first)
        This is the first iteration.
    @endif

    @if ($loop->last)
        This is the last iteration.
    @endif

    <p>This is user {{ $user->id }}</p>
@endforeach
আপনি যদি একটি nested loop এ থাকেন, তাহলে আপনি parent property এর মাধ্যমে parent loop এর $loop ভেরিয়েবল অ্যাক্সেস করতে পারেন:
@foreach ($users as $user)
    @foreach ($user->posts as $post)
        @if ($loop->parent->first)
            This is the first iteration of the parent loop.
        @endif
    @endforeach
@endforeach
$loop ভেরিয়েবলে বিভিন্ন ধরনের অন্যান্য দরকারী property সমূহ রয়েছে:
| Property | Description |
|---|---|
$loop->index |
বর্তমান লুপ এর iteration index (এটি 0 থেকে শুরু হয়)। |
$loop->iteration |
বর্তমান লুপ এর iteration (এটি 1 থেকে শুরু হয়). |
$loop->remaining |
Loop এর মধ্যে অবস্থিত যেসব iteration এখনো বাকি আছে । |
$loop->count |
array তে আইটেমের মোট কত গুলো সংখ্যা iterate করা হচ্ছে তার হিসেবে। |
$loop->first |
এই লুপের মাধ্যমে প্রথম iteration কিনা তা চেক করতে পারবেন। |
$loop->last |
লুপের মধ্যে এটি শেষ iteration কিনা তা চেক করতে পারবেন। |
$loop->even |
লুপের মধ্যে এটি জোড় (even) সংখ্যার iteration কিনা তা চেক করতে পারবেন। |
$loop->odd |
লুপের মধ্যে এটি বেজোড় (odd) সংখ্যার iteration কিনা তা চেক করতে পারবেন। |
$loop->depth |
current loop এর nesting level এর depth কত তা চেক করতে পারবেন। |
$loop->parent |
যখন একটি নেস্টেড লুপে, তখন parent’s loop variable কোনটি , তা জানতে পারবেন । |
Laravel Blade Directive @include
ব্লেডের @include directive ব্যবহার করে আপনি অন্য ভিউ থেকে যেকোনো Blade view কে অন্তর্ভুক্ত করতে পারেন । parent view তে available সমস্ত variables গুলো included view তে available করা হবে।
চলুন আমরা @include ব্যবহার করে blade Template Layout তৈরি করে ফেলি। আমাদের Blade Template Layout টি হবে নিম্নরুপঃ
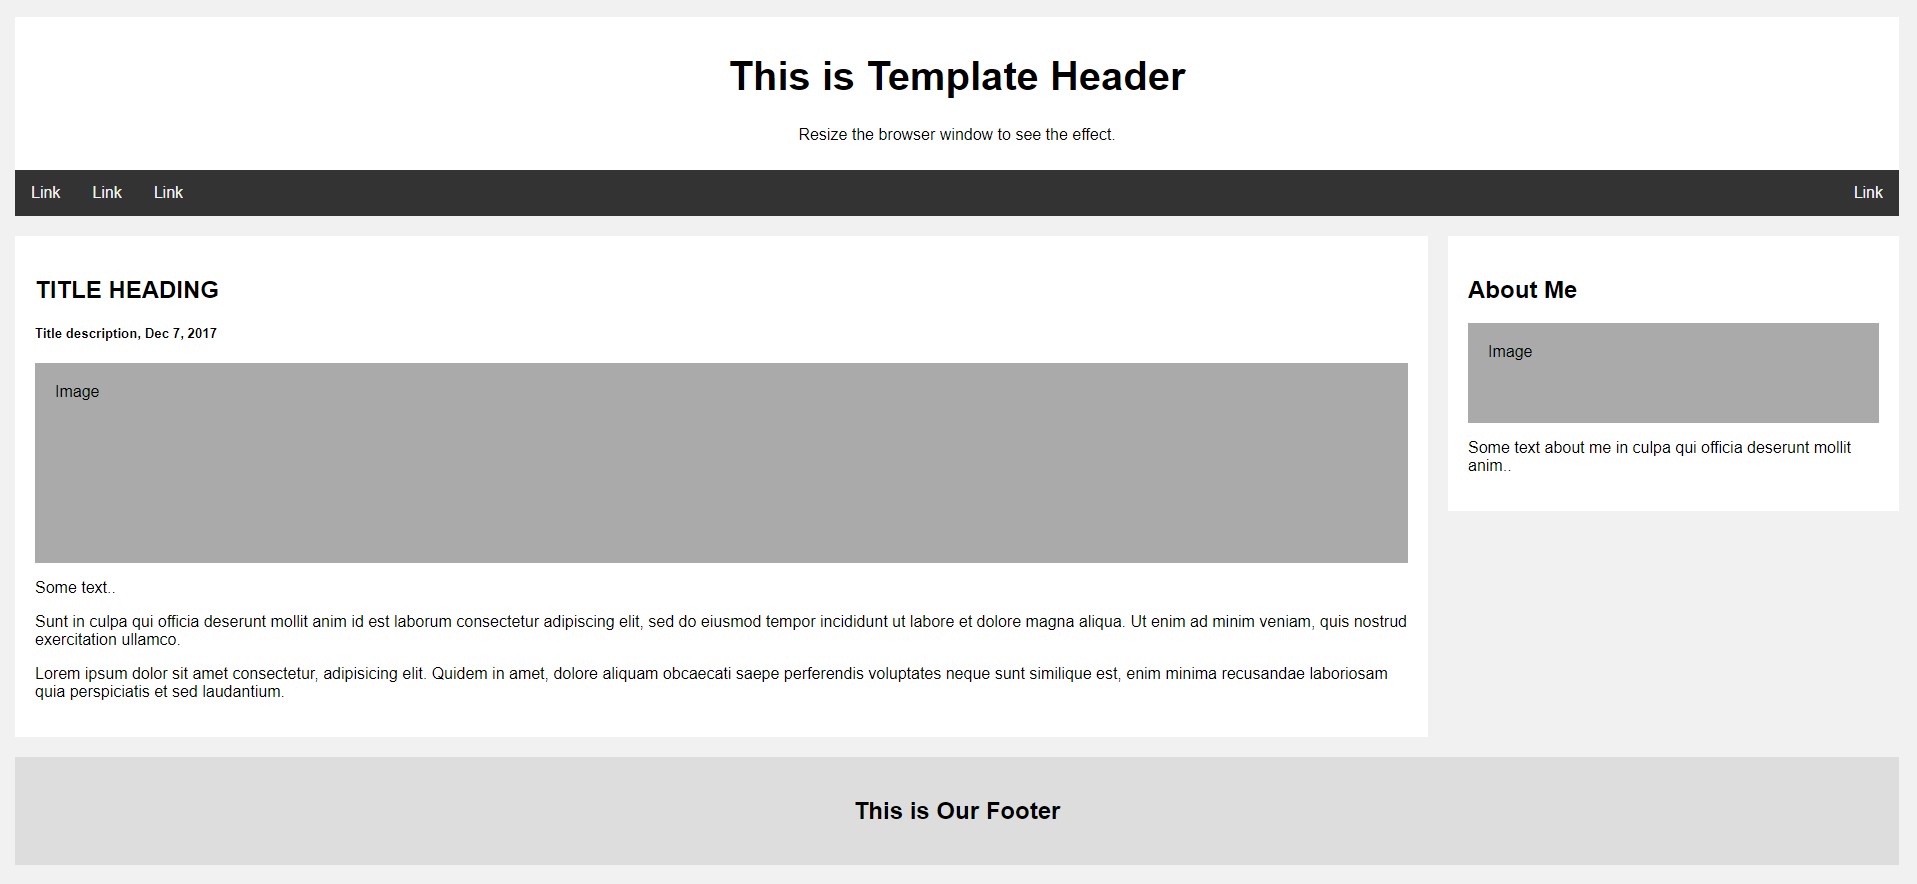
এবং উপরের মোকআপ এর html code গুলো হচ্ছে নিম্নরূপ :
<!DOCTYPE html>
<html>
<head>
<link rel="stylesheet" type="text/css" href="css/styles.css">
<title>Welcome our Homepage</title>
</head>
<body>
<div class="header">
<h1>This is Template Header</h1>
<p>Resize the browser window to see the effect.</p></div>
<div class="topnav">
<a href="#">Link</a>
<a href="#">Link</a>
<a href="#">Link</a>
<a href="#" style="float:right">Link</a>
</div>

<div class="row">
    <div class="leftcolumn">
    <div class="card">
    <h2>TITLE HEADING</h2>
    <h5>Title description, Dec 7, 2017</h5>
    <div class="fakeimg" style="height:200px;">Image</div>
    <p>Some text..</p>
    <p>Sunt in culpa qui officia deserunt mollit anim id est laborum consectetur adipiscing elit, sed do eiusmod tempor incididunt ut labore et dolore magna aliqua. Ut enim ad minim veniam, quis nostrud exercitation ullamco.</p>
    <p>Lorem ipsum dolor sit amet consectetur, adipisicing elit. Quidem in amet, dolore aliquam obcaecati saepe perferendis voluptates neque sunt similique est, enim minima recusandae laboriosam quia perspiciatis et sed laudantium.</p>
</div>
    </div>
    <div class="rightcolumn">
    <div class="card">
  <h2>About Me</h2>
  <div class="fakeimg" style="height:100px;">Image</div>
  <p>Some text about me in culpa qui officia deserunt mollit anim..</p>
</div>
    </div>
</div>
<div class="footer">
<h2>This is Our Footer</h2>
</div>
</body>
</html>
এবং আমাদের styles.css ফাইলটির কোড গুলো হচ্ছে নিম্নরূপ :
* {
  box-sizing: border-box;
}

body {
  font-family: Arial;
  padding: 10px;
  background: #f1f1f1;
}

/* Header/Blog Title */
.header {
  padding: 10px;
  text-align: center;
  background: white;
}

.header h1 {
  font-size: 40px;
}

/* Style the top navigation bar */
.topnav {
  overflow: hidden;
  background-color: #333;
}

/* Style the topnav links */
.topnav a {
  float: left;
  display: block;
  color: #f2f2f2;
  text-align: center;
  padding: 14px 16px;
  text-decoration: none;
}

/* Change color on hover */
.topnav a:hover {
  background-color: #ddd;
  color: black;
}

/* Create two unequal columns that floats next to each other */
/* Left column */
.leftcolumn {
  float: left;
  width: 75%;
}

/* Right column */
.rightcolumn {
  float: left;
  width: 25%;
  background-color: #f1f1f1;
  padding-left: 20px;
}

/* Fake image */
.fakeimg {
  background-color: #aaa;
  width: 100%;
  padding: 20px;
}

/* Add a card effect for articles */
.card {
  background-color: white;
  padding: 20px;
  margin-top: 20px;
}

/* Clear floats after the columns */
.row:after {
  content: "";
  display: table;
  clear: both;
}

/* Footer */
.footer {
  padding: 20px;
  text-align: center;
  background: #ddd;
  margin-top: 20px;
}

/* Responsive layout - when the screen is less than 800px wide, make the two columns stack on top of each other instead of next to each other */
@media screen and (max-width: 800px) {
  .leftcolumn, .rightcolumn {
    width: 100%;
    padding: 0;
  }
}

/* Responsive layout - when the screen is less than 400px wide, make the navigation links stack on top of each other instead of next to each other */
@media screen and (max-width: 400px) {
  .topnav a {
    float: none;
    width: 100%;
  }
}
প্রথমে আমরা উপরের HTML ফাইলের ভিতরের content গুলোকে ফেলে দিয়ে শুধু এর কাঠামো বা খাঁচাটাকে রাখব। এবং এই খাঁচাটা বা কাঠামো টাকে আমরা নাম দিব master.blade.php । এবং Laravel প্রজেক্টের resources/views/frontend ফোল্ডারে সংরক্ষণ করব। এবং কাঠামোর মধ্যে যেই কোড যেখানে ছিল, সেগুলোর প্রত্যেককে আলাদা আলাদা ফাইলে রেখে স্লাইসিং করে আমরা যথাক্রমে header.blade.php, nav.blade.php, right_sidebar.blade.php এবং footer.blade.php তে রূপান্তর করব। এবং Laravel প্রজেক্টের resources/views/frontend ফোল্ডারে সংরক্ষণ করব। এবং সেইসাথে সবগুলো স্লাইসিং করা ফাইলকে master.blade.php ফেলে @include দিয়ে যুক্ত করে দিব। নিম্নে স্লাইসিং ফাইলগুলো দিয়ে দেওয়া হলো।
master.blade.php
<!DOCTYPE html>
<html>
<head>
<link rel="stylesheet" type="text/css" href="css/styles.css">
<title>@yield('title')</title>
</head>
<body>
<div class="header">
@include('frontend.header')
</div>
<div class="topnav">
@include('frontend.nav')
</div>

<div class="row">
    <div class="leftcolumn">
    @yield("content")
    </div>
    <div class="rightcolumn">
    @include('frontend.right_sidebar')
    </div>
</div>
<div class="footer">
@include('frontend.footer')
</div>
</body>
</html>
header.blade.php
<h1>This is Template Header</h1>
<p>Resize the browser window to see the effect.</p>
nav.blade.php
<a href="#">Link</a>
<a href="#">Link</a>
<a href="#">Link</a>
<a href="#" style="float:right">Link</a>
right_sidebar.blade.php
<div class="card">
  <h2>About Me</h2>
  <div class="fakeimg" style="height:100px;">Image</div>
  <p>Some text about me in culpa qui officia deserunt mollit anim..</p>
</div>
footer.blade.php
<h2>This is Our Footer</h2>
মোটামোটি আমাদের Laravel Blade Layout এর কাজ শেষ। এবার আমরা frontend/pages ফোল্ডারের মধ্যে একটা home.blade.php নামে একটা ফাইল তৈরি করব। তবে আপনার styles.css ফাইলটিকে public/css ফোল্ডারে রেখে দিতে ভুলবেন না।
frontend/pages ফোল্ডারের মধ্যে অবস্থিত আমাদের home.blade.php পেজের কোড গুলো নিম্নরুপঃ
@extends('frontend.master')
@section('title', 'Welcome our Homepage')
@section('content')
<div class="card">
    <h2>TITLE HEADING</h2>
    <h5>Title description, Dec 7, 2017</h5>
    <div class="fakeimg" style="height:200px;">Image</div>
    <p>Some text..</p>
    <p>Sunt in culpa qui officia deserunt mollit anim id est laborum consectetur adipiscing elit, sed do eiusmod tempor incididunt ut labore et dolore magna aliqua. Ut enim ad minim veniam, quis nostrud exercitation ullamco.</p>
    <p>Lorem ipsum dolor sit amet consectetur, adipisicing elit. Quidem in amet, dolore aliquam obcaecati saepe perferendis voluptates neque sunt similique est, enim minima recusandae laboriosam quia perspiciatis et sed laudantium.</p>
</div>
@endsection
মোটামোটি সব কাজ শেষ এখন শুধু আপনার routes/web.php তে নিচের মতকরে route ডিফাইন করে দিতে হবে:
Route::get('/',function(){
    return view('frontend.pages.home');
});
এখন যদি আপনি আপনার ব্রাউজারে http://localhost:8000 লিখে হিট করেন। তাহলে আপনি আপনার home.blade.php এর কন্টেন্ট সহ সম্পূর্ণ লেআউট টি লোড হতে দেখতে পাবেন।
@include Directive With Additional Data Pass
যদিও included view তে parent view তে available সমস্ত ডেটা inherit হবে, এক্ষেত্রে আপনি অতিরিক্ত ডেটার একটি অ্যারেও পাস করতে পারেন যা included view তে available করা উচিত:
@include('view.name', ['status' => 'complete'])
আপনি যদি এমন একটি view কে @include করার চেষ্টা করেন যা বিদ্যমান নেই, লারাভেল তখন একটি error throw করবে। আপনি যদি এমন একটি view কে অন্তর্ভুক্ত করতে চান যা থাকতেও পারে বা নাও থাকতে পারে, তাহলে আপনাকে @includeIf directive ব্যবহার করা উচিত:
@includeIf('view.name', ['status' => 'complete'])
আপনি যদি চান যে একটি প্রদত্ত boolean expression true বা false এর উপর ভিত্তি করে @include ব্যবহার করতে চান তবে আপনি @includeWhen এবং @includeUnless directive গুলোব্যবহার করতে পারেন:
@includeWhen($boolean, 'view.name', ['status' => 'complete'])

@includeUnless($boolean, 'view.name', ['status' => 'complete'])
array তে বিদ্যমান অনেকগুলো view থেকে first view include করতে আপনি includeFirst Laravel Blade directives টি ব্যবহার করতে পারেন:
@includeFirst(['custom.admin', 'admin'], ['status' => 'complete'])
আপনার Blade view তে __DIR__ এবং __FILE__ constant সমূহ ব্যবহার করা এড়িয়ে চলা উচিত, কারণ তারা ক্যাশে করা, কম্পাইল করা ভিউয়ের location প্রদর্শন করে।
Laravel Blade Directives Conditional Classes
সাধারণতঃ আমরা যদি একটি Variable এর Value এর উপর ভিত্তি করে কোনো HTML Element এর আউটপুট পরিবর্তন করতে চাইতাম । সে ক্ষেত্রে আমাদেরকে লারাভেল 8.51.0 এর আগের ভার্সন গুলোতে আমরা আমাদের blade ফাইলটি নিচের মতো করে Conditional Statement Directive গুলো দিয়ে লিখতাম :
class.blade.php
<!DOCTYPE html>
<html lang="en">
<head>
    <meta charset="UTF-8">
    <meta http-equiv="X-UA-Compatible" content="IE=edge">
    <meta name="viewport" content="width=device-width, initial-scale=1.0">
    <title>Laravel Conditional Class</title>
    <style>
        .green{
            background-color: green;
            color:#fff;
        }
        .red{
            background-color:red;
            color: #fff;
        }
        .text{
           font-family: Arial, Helvetica, sans-serif;
           text-align: center;
        }
    </style>
</head>
<body>
<h1 class="@if ($isActive)
       green
        @else
       red
        @endif">
Conditional Statement in CSS Class
</h1>
</body>
</html>
এবং আমাদের route ফাইল web.php তে নিচের মতো করে blade ফাইল এ parameter পাস করতাম :
Route::get('/class', function () {
    return view('class', [
        'isActive' => false,
    ]);
});
কিন্তু লারাভেল 8.51.0 থেকে @class Laravel Blade directives একটি CSS class string কে conditionally কম্পাইল করে। যখন value টি একটি boolean expression হয়, তখন directive টি ক্লাস গুলোর একটি array কে accept করে যেখানে array key টি একটি class কে রাখে বা আপনি class গুলিকে এড করতে চান সেগুলো থাকে। যদি array element টি একটি numeric key থাকে তবে এটি সর্বদা রেন্ডার করা class list এ অন্তর্ভুক্ত করা হবে:
অর্থাৎ এখন লারাভেল 8.51.0 থেকে class.blade.php ফাইল টি হবে নিম্নরুপঃ
<!DOCTYPE html>
<html lang="en">
<head>
    <meta charset="UTF-8">
    <meta http-equiv="X-UA-Compatible" content="IE=edge">
    <meta name="viewport" content="width=device-width, initial-scale=1.0">
    <title>Laravel Conditional Class</title>
    <style>
        .green{
            background-color: green;
            color:#fff;
        }
        .red{
            background-color:red;
            color: #fff;
        }
        .text{
           font-family: Arial, Helvetica, sans-serif;
           text-align: center;
        }
    </style>
</head>
<body>

<h1 @class([
            'text', // common classes
            'green' => $isActive,
            'red' => !$isActive
            ])
  >Conditional Class Example using Laravel Blade @class directive</h1>
</body>
</html>
Laravel Blade Directive Checked / Selected / Disabled
সুবিধার জন্য, একটি প্রদত্ত HTML checkbox input “checked” কিনা তা সহজেই নির্দেশ করতে আপনি @checked Laravel Blade directive ব্যবহার করতে পারেন। প্রদত্ত condition টি true হিসাবে মূল্যায়ন করা হলে এই directive টি echo checked হবে:
লারাভেল ফ্রেমওয়ার্ক এর @checked blade directive বুঝার জন্য প্রথমে চলুন আমরা Post নামে একটি নতুন Model তৈরি করব , একইসাথে এর Migration, Controller এবং Factory ও যুক্ত থাকবে। আপনার Command Line Interface (CLI ) এ নিম্নোক্ত কমান্ড টি রান করুন:
php artisan make:model Post -fmc
এবার আপনার posts Migration File এ নিচের মতো করে upgrade করে দিন।
      public function up()
    {
        Schema::create('posts', function (Blueprint $table) {
            $table->id();
            $table->string('title');
            $table->text('content');
            $table->boolean('is_featured')->default(0);
            $table->enum('status', ['Pending', 'Wait', 'Active'])->default('Pending');
            $table->timestamps();
        });
    }
এবার আপনার database/factories/PostFactory.php File এ নিচের code টি যুক্ত করুন , যেন আমরা কিছু Dummy row Generate করতে পারি।
    public function definition()
    {
        return [
            'title' => $this->faker->text($maxNbChars = 50),
            'content' => $this->faker->paragraph(),
            'is_featured' =>$this->faker->boolean(),
            'status' => $this->faker->randomElement(['Pending' ,'Wait', 'Active']),
        ];
    }
এবার Database এ posts Table টি তৈরি করার জন্য আপনার CLI তে নিম্নোক্ত Migration Command টি রান করুন:
php artisan migrate
Migration হয়ে গেলে নিম্নোক্ত কম্যান্ড ব্যবহার করে Laravel Tinker Mode এ এক্সেস করুন।
php artisan tinker
Laravel Tinker Mode এ যাওয়ার পর নিম্নোক্ত কমান্ডটি রান করার মাধ্যমে আপনার posts table এ ন্যূনতম 1০ টি রো তৈরির জন্য নিম্নোক্ত কমান্ড ব্যবহার করুন :
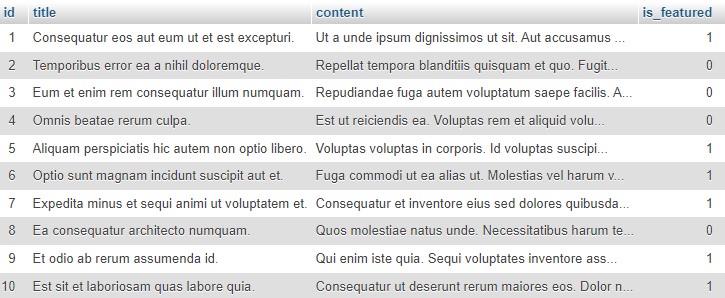
App\Models\Post::factory(10)->create();
এবার আপনি লক্ষ্য করবেন আপনার posts table এ 1০ টি dummy row তৈরি হয়ে গেছে।
@checked blade directive পরীক্ষার জন্য Posts table এবং তার dummy ডাটা রেডি । এখন এই posts table কে কন্ট্রোলার দিয়ে দেখানো এবং ডাটাবেস থেকে প্রোডাক্ট লিস্ট নিয়ে আসার জন্য আমাদেরকে PostController এ নিচের মতো করে আপডেট করে দিতে হবে।
<?php

namespace App\Http\Controllers;

use Illuminate\Http\Request;
use App\Models\Post;
class PostController extends Controller
{
    public function index(){
        $posts = Post::all();
        return view('posts', compact('posts'));
    }
}
এবার আমরা Post List দেখানোর জন্য একটা Master Template তৈরি করব। যার অধীনে আমরা আমাদের Post list এবং Edit Post এর template শো করব। এর জন্য আমরা /resources/views/posts ফোল্ডারের মধ্যে layout.blade.php নামে Master Template ফাইলটি তৈরি করব। নিম্নে layout.blade.php নামে Master Template ফাইলের কোড দেওয়া হলো:
<!DOCTYPE html>
<html>

<head>
    <title>Laravel 9 Checked / Selected / Disabled Blade Directive Testing</title>
    <link href="https://cdn.jsdelivr.net/npm/bootstrap@5.0.2/dist/css/bootstrap.min.css" rel="stylesheet">
</head>

<body>

    <div class="container">
        @yield('content')
    </div>

</body>

</html>
এবার আমরা Post গুলো প্রদর্শনের জন্য posts.blade.php নামে একটা চাইল্ড টেম্পলেট তৈরী করব , যা Master Template layout.blade.php ফাইল থেকে বর্ধিত হবে।
posts.blade.php খুলুন এবং এটিতে নিম্নোক্ত কোড লিখুন।
@extends('posts.layout')

@section('content')
    <div class="row" style="margin-top: 20px;">
        <div class="col-lg-12 margin-tb">
            <div style="text-align: center;">
                <h4>Laravel 9 Checked / Selected / Disabled Blade Directive Testing</h4>
            </div>

        </div>
    </div>

    <table class="table table-bordered" style="margin-top: 20px;">
        <tr>
            <th>Id</th>
            <th>Title</th>
            <th>Status</th>
            <th>Featured</th>
            <th>Action</th>
        </tr>
        @forelse ($posts as $post)
        <tr>
            <td>{{$post->id}}</td>
            <td>{{$post->title}}</td>
            <td>{{$post->status}}</td>
            <td><input type="checkbox" name="featured" value="featured" @checked(old('featuerd', $post->is_featured)) /></td>
            <td><a class="btn btn-primary" href="{{ route('posts.edit', $post->id) }}">Edit</a></td>
        </tr>
        @empty
        <tr>
        <td colspan="3">No posts</td>
        </tr>
        @endforelse
    </table>
@endsection
এবার আপনার route ফাইল web.php তে নিচের মতো করে route ডিফাইন করে দিন।
use App\Http\Controllers\PostController;

//This goes with the other routes
Route::resource('posts',PostController::class);
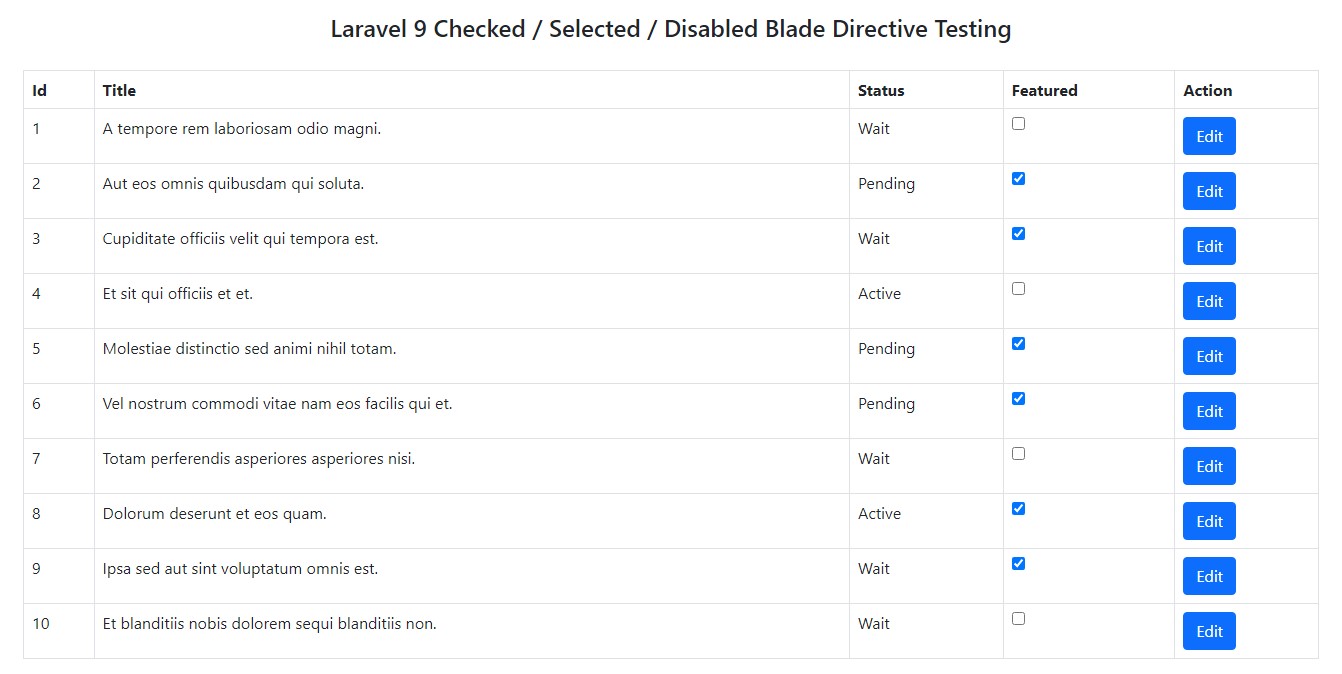
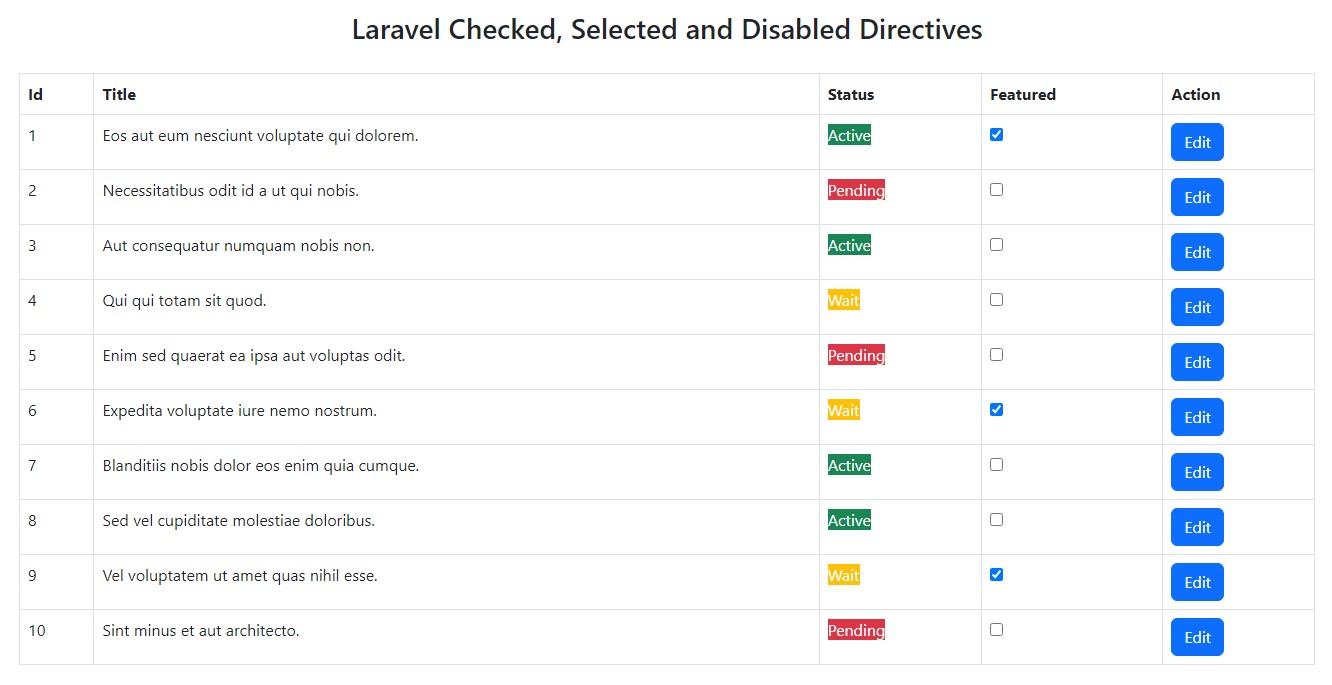
এখন যদি আপনি আপনার ব্রাউজারে http://localhost:8000/posts দিয়ে হিট করেন , তাহলে নিচের মতো Post List দেখতে পাবেন।
এক্ষেত্রে আমরা লারাভেলের ভার্শন ৯ এর আগের ভার্শন গুলোতে নিচের মতো করে checkbox কে check করতাম।
<input type="checkbox" name="featured" {{$post->is_featured ? 'checked' : ''}}>
//OR
<input type="checkbox" name="featured" @if ($post->is_featured) checked @endif>
এখন আপনি চাইলে আপনার উক্ত table এর $post->status এর value এর উপর ভিত্তি করে Laravel Blade Conditional Class ব্যবহার করে , তাদের ব্যাকগ্রাউন্ড কালার পরিবর্তন করে দিতে পারেন।
posts.blade.php ফাইল কে নিচের মতো করে পরিবর্তন করে দিন।
@extends('posts.layout')
@section('content')
<div class="row" style="margin-top:20px">
    <div class="col-lg-12 margin-tb">
        <div style="text-align:center;">
            <h3>Laravel Checked, Selected and Disabled Directives</h3>
        </div>
    </div>
</div>
<table class="table table-bordered" style="margin-top:20px;">
    <tr>
        <th>Id</th>
        <th>Title</th>
        <th>Status</th>
        <th>Featured</th>
        <th>Action</th>

    </tr>
    @forelse($posts as $post)
    <tr>
        <td>{{$post->id}}</td>
        <td>{{$post->title}}</td>
        <td>
            <span @class([
                'text-white',
                'bg-danger'=>$post->status=='Pending',
                'bg-success'=>$post->status=='Active',
                'bg-warning'=>$post->status=='Wait',
                ])>
            {{$post->status}}
            </span>

        </td>
        <td><input type="checkbox" name="featured" value="featured" @checked(old('featured',$post->is_featured)) /></td>
        <td><a class="btn btn-primary" href="{{route('posts.edit',$post->id)}}">Edit</a></td>
    </tr>
@empty
    <tr>
        <td colspan="3">No Posts</td>
    </tr>
    @endforelse
</table>

@endsection
এবার আপনার posts table টি নিম্নরূপ হবে :
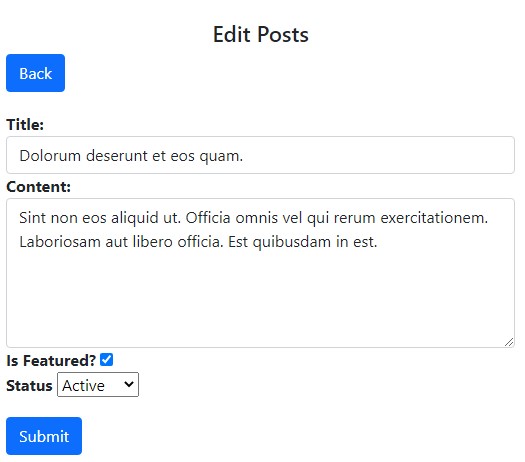
একইভাবে, একটি প্রদত্ত select option “selected” হওয়া উচিত কিনা তা নির্দেশ করতে @selected Laravel Blade directive ব্যবহার করা যেতে পারে। চলুন এই কাজটি বুঝার জন্য , আমরা নিচের মতো করে একটা edit.blade.php ফাইল তৈরি করে নেই।
@extends('posts.layout')

@section('content')
    <div class="row" style="margin-top: 20px;">
        <div class="col-lg-12 margin-tb">
            <div style="text-align: center;">
                <h4>Edit Posts</h4>
            </div>
            <div class="pull-right">
                <a class="btn btn-primary" href="{{ route('posts.index') }}"> Back</a>
            </div>
        </div>
    </div>

    <form action="#" method="POST" enctype="multipart/form-data"
        style="margin-top: 20px;">
        @csrf
        @method('PUT')

        <div class="row">
            <div class="col-xs-12 col-sm-12 col-md-12">
                <div class="form-group">
                    <strong>Title:</strong>
                    <input type="text" name="title" value="{{ $post->title }}" class="form-control" placeholder="Title">
                </div>
            </div>
            <div class="col-xs-12 col-sm-12 col-md-12">
                <div class="form-group">
                    <strong>Content:</strong>
                    <textarea class="form-control" style="height:150px" name="content"
                        placeholder="Content">{{ $post->content }}</textarea>
                </div>
            </div>
            <div class="col-xs-12 col-sm-12 col-md-12">
                <div class="form-group">
                    <strong>Is Featured?</strong>
                    <input type="checkbox" name="featured" value="featured" @checked(old('featuerd', $post->is_featured)) />
                </div>
            </div>
            <div class="col-xs-12 col-sm-12 col-md-12">
                <div class="form-group">
                    <strong>Status</strong>
                    <select name="status">

            @foreach (['Pending', 'Wait', 'Active'] as $status)
                <option value="{{ $status }}" @selected($status == $post->status)>
                    {{ $status }}
                </option>
            @endforeach
         </select>
                </div>
            </div>
            <div class="col-xs-12 col-sm-12 col-md-12" style="margin-top: 20px;">
                <button type="submit" class="btn btn-primary">Submit</button>
            </div>
        </div>

    </form>
@endsection
এবার আপনার PostController ফাইল এ নিচের মতো করে edit ফাঙ্কশনটি তৈরি করে আসুন।
  public function edit(Post $post)
    {
        return view('edit', compact('post'));
    }
এখন যদি আপনি Edit Button এ ক্লিক করেন , তাহলে নিচের মতো @checked @selected দুটি Blade Directive ই কাজ করতেছেন তা দেখতে পাবেন।
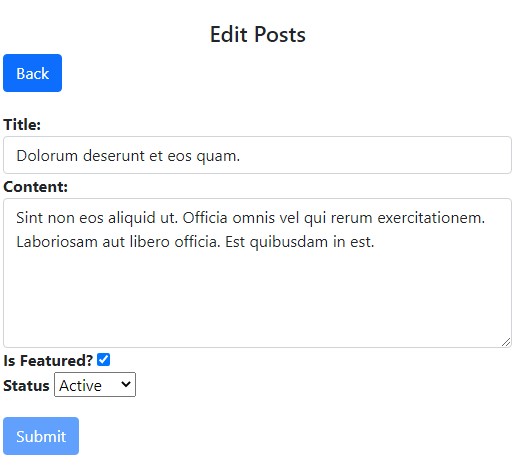
এছাড়াও , একটি প্রদত্ত element “disabled” করা উচিত কিনা নির্দেশ করতে @disabled Laravel Blade directive টি ব্যবহার করা যেতে পারে যে
এখন ধরুন , যেসব Post এর status সেগুলোকে আমরা update করতে দিবোনা। এক্ষেত্রে আমাদেরকে আপডেট বাটন কে disable করে দিতে হবে। আর এই ক্ষেত্রে আমাদের @disabled Laravel Blade Directives টি ব্যবহার করতে হবে।
চলুন এর জন্য আমাদের edit.blade.php ফাইলটিতে @disabled ব্যবহার করে নিচের মতো করে পরিবর্তন করে নেই।
@extends('posts.layout')

@section('content')
    <div class="row" style="margin-top: 20px;">
        <div class="col-lg-12 margin-tb">
            <div style="text-align: center;">
                <h4>Edit Posts</h4>
            </div>
            <div class="pull-right">
                <a class="btn btn-primary" href="{{ route('posts.index') }}"> Back</a>
            </div>
        </div>
    </div>

    <form action="#" method="POST" enctype="multipart/form-data"
        style="margin-top: 20px;">
        @csrf
        @method('PUT')

        <div class="row">
            <div class="col-xs-12 col-sm-12 col-md-12">
                <div class="form-group">
                    <strong>Title:</strong>
                    <input type="text" name="title" value="{{ $post->title }}" class="form-control" placeholder="Title">
                </div>
            </div>
            <div class="col-xs-12 col-sm-12 col-md-12">
                <div class="form-group">
                    <strong>Content:</strong>
                    <textarea class="form-control" style="height:150px" name="content"
                        placeholder="Content">{{ $post->content }}</textarea>
                </div>
            </div>
            <div class="col-xs-12 col-sm-12 col-md-12">
                <div class="form-group">
                    <strong>Is Featured?</strong>
                    <input type="checkbox" name="featured" value="featured" @checked(old('featuerd', $post->is_featured)) />
                </div>
            </div>
            <div class="col-xs-12 col-sm-12 col-md-12">
                <div class="form-group">
                    <strong>Status</strong>
                    <select name="status">

            @foreach (['Pending', 'Wait', 'Active'] as $status)
                <option value="{{ $status }}" @selected($status == $post->status)>
                    {{ $status }}
                </option>
            @endforeach
         </select>
                </div>
            </div>
            <div class="col-xs-12 col-sm-12 col-md-12" style="margin-top: 20px;">
                <button type="submit" class="btn btn-primary" @disabled($post->status=='Active')>Submit</button>
            </div>
        </div>

    </form>
@endsection
Rendering Views For Collections
Blade এর @each Laravel Blade directives এর মাধ্যমে আপনি loop এবং include দুটোকেই একটি লাইনে অন্তর্ভুক্ত করতে পারেন।
@each('view.name', $jobs, 'job')
এই directive এ পাস করা প্রথম আর্গুমেন্ট হল আপনি $user-এর প্রতিটি element এর জন্য যে view render করতে চান, সেটি । দ্বিতীয় আর্গুমেন্ট টি হল যে variable টি আপনি আমাদের ক্ষেত্রে $users এর মাধ্যমে iterate করতে চান, সেটি । আর তৃতীয় আর্গুমেন্টটি হলো,যে variable টি আপনি iteration এর জন্য নির্ধারণ করতে চান সেটি।
আপনি চতুর্থ আর্গুমেন্টটিও পাস করতে পারেন যা প্রদত্ত object বা array খালি থাকলে রেন্ডার করা হবে তা নির্ধারণ করবে।
@each('users.index', $users, 'user', 'users.not_found')
The @once Laravel Blade Directives
@once Laravel Blade directive আপনাকে টেমপ্লেটের একটি অংশ define করতে দেয় যেটি শুধুমাত্র প্রতি rendering cycle এ একবার evaluate করা হবে। স্ট্যাক ব্যবহার করে পেজের হেডারে জাভাস্ক্রিপ্টের একটি প্রদত্ত অংশ পুশ করার জন্য এটি কার্যকর হতে পারে। উদাহরণস্বরূপ, যদি আপনি একটি লুপের মধ্যে একটি প্রদত্ত কম্পোনেন্ট রেন্ডার করছেন, আপনি প্রথমবার কম্পোনেন্ট রেন্ডার করার সময় শুধুমাত্র জাভাস্ক্রিপ্টকে হেডারে পুশ করতে চাইতে পারেন:
@once
    @push('scripts')
        <script>
            // Your custom JavaScript...
        </script>
    @endpush
@endonce
যেহেতু @once Laravel Blade directives প্রায়ই @push বা @prepend Laravel Blade directive গুলোর সাথে ব্যবহার করা হয়, তাই Laravel Blade Directives @pushOnce এবং @prependOnce Laravel Blade directives গুলো আপনার সুবিধার জন্য available :
@pushOnce('scripts')
    <script>
        // Your custom JavaScript...
    </script>
@endPushOnce
Raw PHP in Laravel Blade File
কিছু পরিস্থিতিতে, আপনার view file গুলো তে পিএইচপি কোড এম্বেড করা প্রয়োজন হতে পারে। আপনি আপনার টেমপ্লেটের মধ্যে plain PHP-এর একটি block কে execute করতে Blade এর @php নির্দেশিকা ব্যবহার করতে পারেন:
@php
    $counter = 1;
@endphp
Laravel Blade Directive Comments
Laravel Blade Directive Comments আপনাকে আপনার view File গুলোর মধ্যে comments define করার অনুমতি দেয়। যাইহোক, HTML comments এর বিপরীতে, ব্লেড comments গুলি আপনার অ্যাপ্লিকেশন দ্বারা returned HTML-এর অন্তর্ভুক্ত নয়:
{{-- This comment will not be present in the rendered HTML --}}
Masud Alam
আমি মাসুদ আলম, বাংলাদেশের ৩৬ তম Zend Certified Engineer । ২০০৯ সালে কম্পিউটার সাইন্স থেকে বেচেলর ডিগ্রী অর্জন করি। দীর্ঘ ১৫ বছর আমি Winux Soft, SSL Wireless, IBCS-PRIMAX, Max Group, Canadian International Development Agency (CIDA), Care Bangladesh, World Vision, Hellen Keller, Amarbebsha Ltd সহ বিভিন্ন দেশি বিদেশী কোম্পানিতে ডেটা সাইন্স, মেশিন লার্নিং, বিগ ডেটা, ওয়েব ডেভেলপমেন্ট এবং সফটওয়্যার ডেভেলপমেন্ট এর উপর বিভিন্ন লিডিং পজিশন এ চাকরি এবং প্রজেক্ট লিড করি। এছাড়াও বাংলাদেশের ১৮৫ জন জেন্ড সার্টিফাইড ইঞ্জিনিয়ার এর মধ্যে ১২০ এরও অধিক ছাত্র আমার হাতে জেন্ড সার্টিফাইড ইঞ্জিনিয়ার হয়েছেন। বর্তমানে w3programmers ট্রেনিং ইনস্টিটিউট এ PHP এর উপর Professional এবং Advance Zend Certified PHP -8.2 Engineering, Laravel Mastering Course with ReactJS, Python Beginning To Advance with Blockchain, Machine Learning and Data Science, Professional WordPress Plugin Development Beginning to Advance কোর্স করাই। আর অবসর সময়ে w3programmers.com এ ওয়েব টেকনোলজি নিয়ে লেখালেখি করি।