Laravel Database Eloquent ORM
Retrieving Models
আপনার যদি একটি model এবং এর সাথে সম্পর্কিত database table তৈরি থাকে, তার মানে আপনি আপনার database থেকে data retrieve করা শুরু করতে প্রস্তুত। Laravel Framework এ প্রতিটি Eloquent model এক একটি powerful query builder যা আপনাকে মডেলের সাথে যুক্ত ডাটাবেস টেবিলটি fluently query করতে দেয়। Laravel Framework এর পিছনে মূলতঃ Laravel Query Builder ই কাজ করে। তার মানে Eloquent মডেলগুলি query builders এর সবগুলো method কে support করে। আর তাই আপনি চাইলে Laravel-এর query builder দ্বারা প্রদত্ত সব গুলো method ই ব্যবহার করতে পারেন। অর্থাৎ Eloquent query গুলি লেখার সময় আপনি query builders এর methods গুলির যেকোনো এক বা একাধিক ব্যবহার করতে পারেন।
উদাহরণ গুলো দেখার পূর্বে প্রথমে নিম্নোক্ত কমান্ডের মাধ্যমে Flight Model, flights Table Structure এর জন্য একটি Migration File এবং সেই সাথে কিছু dummy data insert করার জন্য Seeder File তৈরি করুন :
1 | php artisan make:model Flight -ms |
এবার আপনার প্রজেক্টের database/migrations/create_flights_table.php ফাইলে নিচের মতো করে আপডেট করে নিন :
01 02 03 04 05 06 07 08 09 10 11 12 13 14 15 16 17 18 19 20 21 22 23 24 25 26 27 28 29 30 31 32 | <?phpuse Illuminate\Database\Migrations\Migration;use Illuminate\Database\Schema\Blueprint;use Illuminate\Support\Facades\Schema;return new class extends Migration{ /** * Run the migrations. */ public function up(): void { Schema::create('flights', function (Blueprint $table) { $table->id(); $table->string('flight_number'); $table->string('departure_airport'); $table->string('arrival_airport'); $table->dateTime('departure_time'); $table->dateTime('arrival_time'); $table->timestamps(); }); } /** * Reverse the migrations. */ public function down(): void { Schema::dropIfExists('flights'); }}; |
এবার নিম্নোক্ত কমান্ডের মাধ্যমে উক্ত Migration ফাইল থেকে Database Table Structure টি তৈরি করে নিন :
1 | php artisan migrate |
এবার flights table এ কিছু dummy data insert করার জন্য সদ্য তৈরি হওয়া আপনার প্রজেক্টের database/seeders/FlightSeeder.php ফাইলটি নিচের মতো করে আপডেট করে নিন :
01 02 03 04 05 06 07 08 09 10 11 12 13 14 15 16 17 18 19 20 21 22 23 24 25 26 27 28 29 30 31 32 33 34 35 36 37 38 39 40 41 42 43 44 45 46 47 48 49 50 51 52 53 54 55 56 57 58 59 60 61 62 63 64 65 | <?phpnamespace Database\Seeders;use Illuminate\Database\Console\Seeds\WithoutModelEvents;use Illuminate\Database\Seeder;use App\Models\Flight;class FlightSeeder extends Seeder{ /** * Run the database seeds. */ public function run(): void { $flights = [ [ 'flight_number' => 'AA101', 'departure_airport' => 'JFK', 'arrival_airport' => 'LAX', 'departure_time' => '2022-04-01 08:00:00', 'arrival_time' => '2022-04-01 11:00:00', ], [ 'flight_number' => 'DL202', 'departure_airport' => 'LAX', 'arrival_airport' => 'JFK', 'departure_time' => '2022-04-02 13:00:00', 'arrival_time' => '2022-04-02 19:00:00', ], [ 'flight_number' => 'UA303', 'departure_airport' => 'SFO', 'arrival_airport' => 'ORD', 'departure_time' => '2022-04-03 10:00:00', 'arrival_time' => '2022-04-03 16:00:00', ], [ 'flight_number' => 'AA102', 'departure_airport' => 'LAX', 'arrival_airport' => 'JFK', 'departure_time' => '2022-04-06 09:00:00', 'arrival_time' => '2022-04-09 12:00:00', ], [ 'flight_number' => 'DL204', 'departure_airport' => 'JFK', 'arrival_airport' => 'LAX', 'departure_time' => '2022-03-02 13:00:00', 'arrival_time' => '2022-03-02 19:00:00', ], [ 'flight_number' => 'UA304', 'departure_airport' => 'ORD', 'arrival_airport' => 'SFO', 'departure_time' => '2022-01-03 06:00:00', 'arrival_time' => '2022-01-03 13:00:00', ], ]; foreach ($flights as $flight) { Flight::create($flight); } }} |
এবার FlightSeeder ক্লাস টিকে DatabaseSeeder.php ফাইলে নিচের মতো করে রেজিস্ট্রি করে নিন :
1 2 3 4 5 6 | public function run(): void { $this->call([ FlightSeeder::class, ]); } |
dummy data গুলো insert করার জন্য নিম্নোক্ত কমান্ডটি রান করুন :
1 | php artisan db:seed |
Retrieving All Rows From A Table
একটি table থেকে সব গুলো ডেটা নিয়ে আসতে আপনি আপনার Model এর সাথে get() অথবা all() method টি ব্যবহার করতে পারেন:
get() Method Example
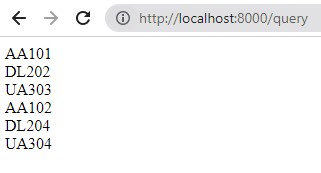
1 2 3 4 5 6 7 | use App\Models\Flight; Route::get('/query', function () { foreach (Flight::get() as $flight) { echo $flight->flight_number,"<br>"; }}); |
all() Method Example
1 2 3 4 5 6 7 | use App\Models\Flight; Route::get('/query', function () { foreach (Flight::all() as $flight) { echo $flight->flight_number,"<br>"; }}); |
উপরের দুটি উদাহরণই নিচের ছবির মতো করে রেজাল্ট দিবে :
Building Queries
Eloquent এর all method মডেলের টেবিল থেকে সমস্ত ফলাফল return করে। যাইহোক, যেহেতু প্রতিটি Eloquent model একটি query builder হিসাবে কাজ করে, আপনি query গুলিতে অতিরিক্ত constraints যুক্ত করতে পারেন এবং তারপর ফলাফলগুলি retrieve করার জন্য get method টি ব্যবহার করতে পারেন:
01 02 03 04 05 06 07 08 09 10 11 | use App\Models\Flight; Route::get('/query', function () { $flights = Flight::where('flight_number', 'DL202') ->orderBy('arrival_time') ->take(2) ->get(); echo '<pre>'; print_r($flights); echo "</pre>";}); |
Refreshing Models
যদি আপনার কাছে ইতিমধ্যেই একটি Eloquent মডেলের একটি instance থাকে যা ডাটাবেস থেকে retrieved করা হয়েছে, আপনি fresh এবং refresh methods ব্যবহার করে model টিকে “refresh” করতে পারেন। নতুন method টি ডাটাবেস থেকে মডেলটিকে পুনরুদ্ধার করবে। বিদ্যমান মডেল এর instance প্রভাবিত হবে না:
1 2 3 | $flight = Flight::where('number', 'FR 900')->first(); $freshFlight = $flight->fresh(); |
refresh method ডাটাবেস থেকে fresh data ব্যবহার করে বিদ্যমান মডেলটিকে পুনরায় হাইড্রেট করবে। এছাড়াও, এর সমস্ত লোড relationships গুলিও রিফ্রেশ করা হবে:
01 02 03 04 05 06 07 08 09 10 11 | use App\Models\Flight; Route::get('/query', function () { $flight = Flight::where('flight_number', 'UA303')->first(); $flight->flight_number = 'FR 456'; $flight->refresh(); echo $flight->flight_number; // "UA303"}); |
Collections
Laravel এর Eloquent ORM-এ, collection হল এমন একটি object যা Eloquent model এর instance গুলির একটি সেট রিপ্রেজেন্ট করে। Collections গুলি Model instance গুলির groups গুলির সাথে কাজ করার একটি সুবিধাজনক এবং শক্তিশালী উপায় প্রদান করে, যা আপনাকে সহজেই filtering, sorting এবং অন্যান্য operations গুলি সম্পাদন করতে দেয়৷
যেমনটি আমরা উপরের উদাহরণে দেখেছি, all এবং get Eloquent method গুলো database থেকে একাধিক রেকর্ড retrieve করে। কিন্তু, এই method গুলি একটি plain PHP array রিটার্ন করে না। তার পরিবর্তে, Illuminate\Database\Eloquent\Collection এর একটি উদাহরণ দেওয়া হয়েছে।
Eloquent Collection class টি Laravel এর base Illuminate\Support\Collection class কে extends করে, যা data collections এর সাথে ইন্টারঅ্যাক্ট করার জন্য বিভিন্ন ধরনের helpful method গুলো প্রদান করে। উদাহরণস্বরূপ, reject method টি একটি invoked closure এর ফলাফলের উপর ভিত্তি করে একটি collection থেকে মডেলগুলি রিমুভ করার জন্য ব্যবহার করা যেতে পারে:
01 02 03 04 05 06 07 08 09 10 11 12 13 14 15 16 | use App\Models\Flight; Route::get('/query', function () { $flights = Flight::where('flight_number', 'DL202')->get(); //dd($flights) // with model foreach($flights as $flight){ echo $flight->departure_airport; } echo '<br>'; $flights = $flights->reject(function (Flight $flight) { //dd($flight) // without model echo $flight->departure_airport; });}); |
আপনি যদি উপরের কোডটি রান করেন, তাহলে আপনি লক্ষ্য করবেন প্রথম dd() method Flight Model সহ ডেটা গুলো রিটার্ন করবে। যার জন্য আপনাকে foreach loop ব্যবহার করতে হয়েছে। আর দ্বিতীয় dd() Method টি Model ব্যতীত আসাতে আপনি foreach loop ছাড়াই ডেটা গুলো রিটার্ন করতে পারবেন।
Database এর একটি নির্দিষ্ট table থেকে একটি single row অথবা single column retrieve করা
আপনি আপনার Model ব্যবহার করে Database এর table থেকে একটি single row অথবা single column retrieve করার প্রয়োজন হলে, আপনি first Method ব্যবহার করতে পারেন। আপনার route web.php File এ নিচের কোডটি লিখুন :
1 2 3 4 5 6 | use App\Models\Flight;Route::get('/getval', function () { $user=Flight::where('flight_number', 'UA303')->first(); echo $user->arrival_time;}); |
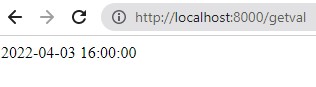
আপনি সম্পূর্ণ row এর পরিবর্তে সরাসরি একটি column এর value print করতে চাইলে value() method টি ব্যবহার করতে পারেন। এর জন্যে আপনার route web.php File এ নিচের কোডটি লিখুন :
1 2 3 4 5 6 | use App\Models\Flight;Route::get('/getval', function () { $arrival_time = Flight::where('flight_number', 'UA303')->value('arrival_time'); echo $arrival_time;}); |
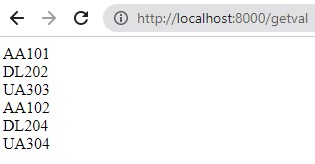
Table এর একটি নির্দিষ্ট column এর সব row একসাথে retrieve করা :
Table এর একটি নির্দিষ্ট column এর সব row একসাথে retrieve করতে চাইলে আপনি pluck() Method ব্যবহার করতে পারেন। নিচের উদাহরণটি দেখুন :
1 2 3 4 5 6 7 8 | use App\Models\Flight;Route::get('/getval', function () { $flights = Flight::pluck('flight_number'); foreach ($flights as $flight) { echo $flight,"<br>"; }}); |
তবে আপনি চাইলে Pluck Method দিয়ে table এর একটি column কে key এবং অন্যটিকে value হিসেবে রিটার্ন করতে পারেন । নিচের উদাহরণটি দেখুন :
01 02 03 04 05 06 07 08 09 10 11 12 13 14 15 16 | use App\Models\Flight;Route::get('/getval', function () { $flights = Flight::pluck('arrival_time','flight_number'); $table = "<table border='1'"; $table .= "<tr>"; $table .= "<th>Flight Number</th><th>Arrival Time</th>"; $table .= "</tr>"; foreach ($flights as $flight_number=>$arrival_time) { $table .= "<tr>"; $table.="<td>$flight_number</td><td>$arrival_time</td>"; $table .= "</tr>"; } $table .= "</table>"; echo $table;}); |
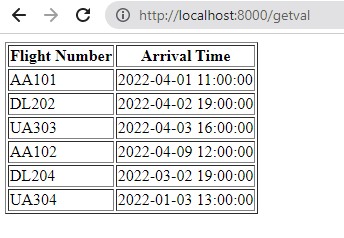
Specifying A Select Clause
উপরের উদহারণ গুলোতে ডেটাবেসের টেবিল এর সবগুলো রো select হয়। আপনি সবসময় একটি ডাটাবেস টেবিল থেকে সব কলাম select করতে চান না. select method ব্যবহার করে, আপনি query এর জন্য একটি কাস্টম “select” clause নির্দিষ্ট করতে পারেন:
01 02 03 04 05 06 07 08 09 10 11 12 13 14 15 16 17 | use App\Models\Flight;Route::get('/getval', function () { $flights = Flight::select('flight_number', 'arrival_time') ->get(); $table = "<table border='1'"; $table .= "<tr>"; $table .= "<th>Flight Number</th><th>Arrival Time</th>"; $table .= "</tr>"; foreach ($flights as $flight) { $table .= "<tr>"; $table.="<td>".$flight->flight_number."</td><td>".$flight->arrival_time."</td>"; $table .= "</tr>"; } $table .= "</table>"; echo $table;}); |
এছাড়াও distinct method ব্যবহার করে আপনি ক্যোয়ারীটিকে distinct রেজাল্ট রিটার্ন করার জন্য force করতে পারেন:
01 02 03 04 05 06 07 08 09 10 11 12 13 14 15 16 17 18 | use App\Models\Flight;Route::get('/getval', function () { $flights = Flight::select('flight_number', 'arrival_time') ->distinct() ->get(); $table = "<table border='1'"; $table .= "<tr>"; $table .= "<th>Flight Number</th><th>Arrival Time</th>"; $table .= "</tr>"; foreach ($flights as $flight) { $table .= "<tr>"; $table.="<td>".$flight->flight_number."</td><td>".$flight->arrival_time."</td>"; $table .= "</tr>"; } $table .= "</table>"; echo $table;}); |
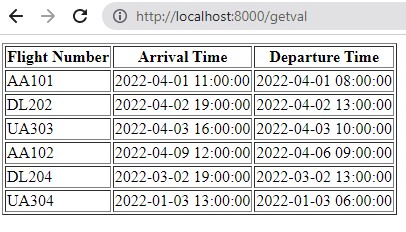
আপনার যদি ইতিমধ্যেই একটি Eloquent instance থাকে এবং আপনি তার বিদ্যমান select clause এ নতুন করে একটি কলাম add করতে চান, তাহলে আপনি addSelect method ব্যবহার করতে পারেন:
01 02 03 04 05 06 07 08 09 10 11 12 13 14 15 16 17 | use App\Models\Flight;Route::get('/getval', function () { $flights = Flight::select('flight_number', 'arrival_time'); $more= $flights->addSelect('departure_time')->get(); $table = "<table border='1'"; $table .= "<tr>"; $table .= "<th>Flight Number</th><th>Arrival Time</th><th>Departure Time</th>"; $table .= "</tr>"; foreach ($more as $flight) { $table .= "<tr>"; $table.="<td>".$flight->flight_number."</td><td>".$flight->arrival_time."</td><td>".$flight->departure_time."</td>"; $table .= "</tr>"; } $table .= "</table>"; echo $table;}); |
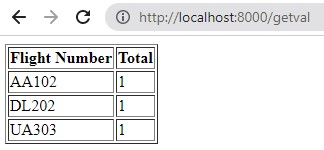
Raw Expressions
কখনো কখনো আপনাকে একটি ক্যোয়ারীতে একটি arbitrary string সন্নিবেশ করতে হতে পারে। একটি raw string expression তৈরি করতে, আপনি Model দ্বারা প্রদত্ত raw method ব্যবহার করতে পারেন:
01 02 03 04 05 06 07 08 09 10 11 12 13 14 15 16 17 18 19 20 | use App\Models\Flight;Route::get('/getval', function () { $flights = Flight::select(Flight::raw('count(*) as total, flight_number')) ->where('arrival_time', '>=', '2022-04-02 19:00:00') ->groupBy('flight_number') ->get(); $table = "<table border='1'"; $table .= "<tr>"; $table .= "<th>Flight Number</th><th>Total</th>"; $table .= "</tr>"; foreach ($flights as $flight) { $table .= "<tr>"; $table.="<td>".$flight->flight_number."</td><td>".$flight->total."</td>"; $table .= "</tr>"; } $table .= "</table>"; echo $table;}); |
Raw Methods
DB::raw Method ব্যবহার করার পরিবর্তে, আপনি আপনার query এর বিভিন্ন অংশে একটি raw expression সন্নিবেশ করতে নিম্নলিখিত methods গুলিও ব্যবহার করতে পারেন। মনে রাখবেন, লারাভেল গ্যারান্টি দিতে পারে না যে raw expressions ব্যবহার করে কোনো query , SQL injection vulnerabilities বিরুদ্ধে সুরক্ষিত
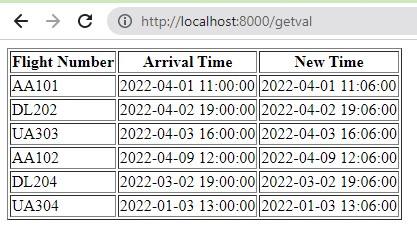
selectRaw
AddSelect(DB::raw(/* … */)) এর পরিবর্তে আমরা SelectRaw Method ব্যবহার করা যেতে পারে। এই method টি তার দ্বিতীয় argument হিসাবে বাইন্ডিংয়ের একটি ঐচ্ছিক অ্যারে গ্রহণ করে:
01 02 03 04 05 06 07 08 09 10 11 12 13 14 15 16 17 18 19 20 | use App\Models\Flight;Route::get('/getval', function () { $flights =Flight::selectRaw('flight_number,arrival_time,arrival_time + ? as new_time', [600]) ->get(); $table = "<table border='1'"; $table .= "<tr>"; $table .= "<th>Flight Number</th><th>Arrival Time</th><th>New Time</th>"; $table .= "</tr>"; foreach ($flights as $flight) { $dateString = $flight->new_time; $dateTime = \DateTime::createFromFormat('YmdHis', $dateString); $table .= "<tr>"; $table.="<td>".$flight->flight_number."</td><td>".$flight->arrival_time."</td><td>".$dateTime->format('Y-m-d H:i:s')."</td>"; $table .= "</tr>"; } $table .= "</table>"; echo $table;}); |
whereRaw / orWhereRaw
whereRaw এবং orWhereRaw Method দুটি দিয়ে আপনার ক্যোয়ারী এর where clause এ যথাক্রমে ‘or’ এবং ‘and’ logical operator যুক্ত করতে পারেন:
01 02 03 04 05 06 07 08 09 10 11 | use App\Models\Flight;Route::get('/getval', function () { $flights =Flight::select('flight_number','arrival_time','departure_time') ->whereRaw('arrival_time= ? and departure_time=?',['2022-04-02 19:00:00','2022-04-02 13:00:00']) ->get(); echo "<pre>"; print_r($flights); echo "</pre>";}); |
havingRaw / orHavingRaw
havingRaw এবং orHavingRaw Method দুটি দিয়ে আপনার ক্যোয়ারী এর having clause এ যথাক্রমে ‘or’ এবং ‘and’ logical operator যুক্ত করতে পারেন।
তবে তার আগে নিম্নোক্ত orderdetails table স্ট্রাকচার এবং ডেটা এর জন্য নিম্নোক্ত Model, Migration এবং Seeder File তৈরি করে নিন :
1 | php artisan make:model OrderDetail -ms |
এবার সদ্য তৈরি হওয়া ফাইল গুলোকে নিচের মতো করে আপডেট করে নিন :
OrderDetail Model
01 02 03 04 05 06 07 08 09 10 11 12 13 14 | <?phpnamespace App\Models;use Illuminate\Database\Eloquent\Factories\HasFactory;use Illuminate\Database\Eloquent\Model;class OrderDetail extends Model{ use HasFactory; public $timestamps=false; protected $fillable = ['orderNumber', 'productCode', 'quantityOrdered', 'priceEach'];} |
create_order_details_table.php Migratin File
01 02 03 04 05 06 07 08 09 10 11 12 13 14 15 16 17 18 19 20 21 22 23 24 25 26 27 28 29 | <?phpuse Illuminate\Database\Migrations\Migration;use Illuminate\Database\Schema\Blueprint;use Illuminate\Support\Facades\Schema;return new class extends Migration{ /** * Run the migrations. */ public function up(): void { Schema::create('order_details', function (Blueprint $table) { $table->integer('orderNumber'); $table->string('productCode', 15); $table->integer('quantityOrdered'); $table->decimal('priceEach', 10, 2); }); } /** * Reverse the migrations. */ public function down(): void { Schema::dropIfExists('order_details'); }}; |
OrderDetailSeeder.php
01 02 03 04 05 06 07 08 09 10 11 12 13 14 15 16 17 18 19 20 21 22 23 24 25 26 27 28 29 30 31 32 33 34 35 36 37 38 39 40 41 42 43 44 45 46 47 48 49 50 51 52 53 54 55 56 57 58 59 60 61 62 63 64 65 66 67 68 69 70 71 72 73 74 75 76 77 78 79 80 81 82 83 84 85 86 87 88 89 90 91 92 93 94 | <?phpnamespace Database\Seeders;use Illuminate\Database\Console\Seeds\WithoutModelEvents;use Illuminate\Database\Seeder;use App\Models\OrderDetail;class OrderDetailSeeder extends Seeder{ /** * Run the database seeds. */ public function run(): void { $orderDetails = [ [ 'orderNumber' => 10423, 'productCode' => 'S18_3320', 'quantityOrdered' => 21, 'priceEach' => '80.36' ], [ 'orderNumber' => 10423, 'productCode' => 'S24_4258', 'quantityOrdered' => 28, 'priceEach' => '78.89' ], [ 'orderNumber' => 10424, 'productCode' => 'S10_1949', 'quantityOrdered' => 50, 'priceEach' => '201.44' ], [ 'orderNumber' => 10424, 'productCode' => 'S12_1666', 'quantityOrdered' => 49, 'priceEach' => '121.64' ], [ 'orderNumber' => 10424, 'productCode' => 'S18_1097', 'quantityOrdered' => 54, 'priceEach' => '108.50' ], [ 'orderNumber' => 10424, 'productCode' => 'S18_4668', 'quantityOrdered' => 26, 'priceEach' => '40.25' ], [ 'orderNumber' => 10424, 'productCode' => 'S32_3522', 'quantityOrdered' => 44, 'priceEach' => '54.94' ], [ 'orderNumber' => 10424, 'productCode' => 'S700_2824', 'quantityOrdered' => 46, 'priceEach' => '85.98' ], [ 'orderNumber' => 10425, 'productCode' => 'S10_4962', 'quantityOrdered' => 38, 'priceEach' => '131.49' ], [ 'orderNumber' => 10425, 'productCode' => 'S12_4473', 'quantityOrdered' => 33, 'priceEach' => '95.99' ], [ 'orderNumber' => 10425, 'productCode' => 'S18_2238', 'quantityOrdered' => 28, 'priceEach' => '147.36' ], [ 'orderNumber' => 10425, 'productCode' => 'S18_2319', 'quantityOrdered' => 38, 'priceEach' => '117.82' ], ]; foreach ($orderDetails as $orderdetail) { OrderDetail::create($orderdetail); } }} |
এবার OrderDetailSeeder ক্লাস টিকে DatabaseSeeder.php ফাইলে নিচের মতো করে রেজিস্ট্রি করে নিন :
1 2 3 4 5 6 | public function run(): void { $this->call([ OrderDetailSeeder::class, ]); } |
dummy data গুলো insert করার জন্য নিম্নোক্ত কমান্ডটি রান করুন :
1 | php artisan db:seed |
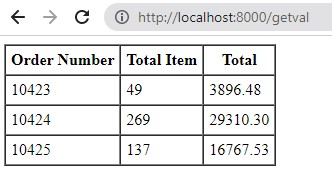
এইবার এই উদাহরণটি রান করে দেখতে পারেন :
01 02 03 04 05 06 07 08 09 10 11 12 13 14 15 16 17 18 19 20 | use App\Models\OrderDetail;Route::get('/getval', function () {$order_details = OrderDetail::select('ordernumber', OrderDetail::raw('SUM(quantityOrdered) AS itemsCount,SUM(priceeach*quantityOrdered) AS total')) ->groupBy('ordernumber') ->havingRaw('total > ?', [1000]) ->get();$table = "<table border='1' cellpadding='5' cellspacing='0'";$table .= "<tr>";$table .= "<th>Order Number</th><th>Total Item</th><th>Total</th>";$table .= "</tr>";foreach ($order_details as $order) { $table .= "<tr>"; $table.="<td>".$order->ordernumber."</td><td>".$order->itemsCount."</td><td>".$order->total."</td>"; $table .= "</tr>";}$table .= "</table>";echo $table;}); |
orderByRaw
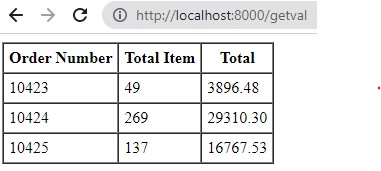
OrderByRaw method টি SQL এর “order by” clause এর জন্য ব্যবহার করা যেতে পারে:
01 02 03 04 05 06 07 08 09 10 11 12 13 14 15 16 17 18 19 20 | use App\Models\OrderDetail;Route::get('/getval', function () {$order_details = OrderDetail::select('ordernumber', OrderDetail::raw('SUM(quantityOrdered) AS itemsCount,SUM(priceeach*quantityOrdered) AS total')) ->groupBy('ordernumber') ->orderByRaw('ordernumber') ->get();$table = "<table border='1' cellpadding='5' cellspacing='0'";$table .= "<tr>";$table .= "<th>Order Number</th><th>Total Item</th><th>Total</th>";$table .= "</tr>";foreach ($order_details as $order) { $table .= "<tr>"; $table.="<td>".$order->ordernumber."</td><td>".$order->itemsCount."</td><td>".$order->total."</td>"; $table .= "</tr>";}$table .= "</table>";echo $table;}); |
Chunking Results
all অথবা get method গুলো দিয়ে অনেক বেশি Eloquent records লোড করার চেষ্টা করলে আপনার অ্যাপ্লিকেশনের out of memory হয়ে যেতে পারে । অথবা অনেকগুলো email একসাথে পাঠাতে গেলে আপনাকে অনেক সময় সমস্যায় পড়তে হয়। এই method গুলি ব্যবহার করার পরিবর্তে, বড় সংখ্যক মডেলকে আরও দক্ষতার সাথে প্রক্রিয়া করতে chunk method ব্যবহার করা যেতে পারে।
01 02 03 04 05 06 07 08 09 10 11 12 13 14 15 16 17 18 19 20 | use App\Models\Flight;Route::get('/query',function(){ Flight::orderBy('id')->chunk(2, function ($flights) { $table="<table border='1' cellpadding='5' cellspacing='0'"; $table.="<tr>"; $table.="<th>Flight Number</th><th>Arrival Airport</th><th>Departure Airport</th>"; $table.="</tr>"; foreach ($flights as $flight){ $table.="<tr>"; $table.="<td>".$flight->flight_number."</td>"; $table.="<td>".$flight->arrival_airport."</td>"; $table.="<td>".$flight->departure_airport."</td>"; $table.="</tr>"; } $table.="</table><br><br>"; echo $table; });}); |
তবে আপনি চাইলে এই সম্পূর্ণ কাজটি আপনার মডেলে একটা static method এর মাধমেও করতে পারেন। প্রথমে আপনার মডেলে নিম্নোক্ত getFlights Method নামে একটি static method declare করুন :
01 02 03 04 05 06 07 08 09 10 11 12 13 14 15 16 17 18 19 20 21 22 23 24 25 26 27 28 | <?phpnamespace App\Models;use Illuminate\Database\Eloquent\Factories\HasFactory;use Illuminate\Database\Eloquent\Model;class Flight extends Model{ use HasFactory; public static function getFlights(){ return self::orderBy('id')->chunk(2, function ($flights) { $table="<table border='1' cellpadding='5' cellspacing='0'"; $table.="<tr>"; $table.="<th>Flight Number</th><th>Arrival Airport</th><th>Departure Airport</th>"; $table.="</tr>"; foreach ($flights as $flight){ $table.="<tr>"; $table.="<td>".$flight->flight_number."</td>"; $table.="<td>".$flight->arrival_airport."</td>"; $table.="<td>".$flight->departure_airport."</td>"; $table.="</tr>"; } $table.="</table><br><br>"; echo $table; }); }} |
এখন আপনার route টি হবে নিম্নরুপঃ
1 2 3 4 5 | use App\Models\Flight;Route::get('/query',function(){ Flight::getFlights();}); |
উপরের দুটি উদাহরণের আউটপুট আসবে নিম্নরুপঃ

chunkById Method
আপনি রেজাল্ট গুলোকে chunking করা কালীন, যেকোনো ডাটাবেস রেকর্ড আপডেট করলে, আপনার chunk রেজাল্ট গুলো unexpected চেঞ্জ হতে পারে। আপনি যদি chunking করার সময় রিট্রিভ করা রেকর্ডগুলি আপডেট করতে চান , তবে chunk method এর পরিবর্তে chunkById Method টি ব্যবহার করা উত্তম। কেননা “chunkById” id এবং limit ব্যবহার করে যখন “chunk” limit এবং offset ব্যবহার করে। অর্থাৎ chunkById method টি automatically রেকর্ড গুলোর primary key এর উপর ভিত্তি করে ফলাফলগুলিকে paginate করবে।
অন্যভাবে বলা যায় , chunkById method হল একটি ডাটাবেস টেবিল থেকে প্রচুর সংখ্যক রেকর্ড retrieve করার এবং মেমরির সমস্যা এড়াতে ছোট ছোট “chunks” এ process করার একটি উপায়। এটি chunk method এর অনুরূপভাবে কাজ করে, তবে প্রতিটি chunk retrieve করার জন্য রেকর্ডের সংখ্যা নির্দিষ্ট করার পরিবর্তে, এটি প্রতিটি chunk এ retrieve করা রেকর্ডের শেষ আইডি নির্দিষ্ট করে । এইভাবে, এটি আপনাকে smoothly প্রচুর পরিমাণে ডেটা পরিচালনা করতে সুযোগ দেয়।
তবে তার আগে নিম্নোক্ত users table স্ট্রাকচার এবং ডেটা এর জন্য নিম্নোক্ত Model, Migration এবং Seeder File তৈরি করে নিন :
1 | php artisan make:model User -ms |
এবার সদ্য তৈরি হওয়া ফাইল গুলোকে নিচের মতো করে আপডেট করে নিন :
User.php Model File
01 02 03 04 05 06 07 08 09 10 11 12 13 14 15 16 17 18 19 20 21 22 23 | <?phpnamespace App\Models;use Illuminate\Database\Eloquent\Factories\HasFactory;use Illuminate\Database\Eloquent\Model;class User extends Model{ use HasFactory; protected $fillable = [ 'name', 'email', 'email_verified_at', 'phone', 'age', 'gender' ]; protected $casts = [ 'email_verified_at' => 'datetime', 'age' => 'float', ]; protected $enumCasts = [ 'gender' => 'string', ];} |
create_users_table.php Migration File
01 02 03 04 05 06 07 08 09 10 11 12 13 14 15 16 17 18 19 20 21 22 23 24 25 26 27 28 29 30 31 32 33 | <?phpuse Illuminate\Database\Migrations\Migration;use Illuminate\Database\Schema\Blueprint;use Illuminate\Support\Facades\Schema;return new class extends Migration{ /** * Run the migrations. */ public function up(): void { Schema::create('users', function (Blueprint $table) { $table->id(); $table->string('name'); $table->string('email'); $table->timestamp('email_verified_at')->nullable(); $table->string('phone'); $table->float('age'); $table->enum('gender', ['Male', 'Female']); $table->timestamps(); }); } /** * Reverse the migrations. */ public function down(): void { Schema::dropIfExists('users'); }}; |
UserSeeder.php Seeder File
01 02 03 04 05 06 07 08 09 10 11 12 13 14 15 16 17 18 19 20 21 22 23 24 25 26 27 28 29 30 31 32 33 34 35 36 37 38 39 40 41 42 43 44 45 46 47 48 49 50 51 52 53 54 55 56 57 58 59 60 61 62 63 64 65 66 67 68 69 70 71 72 73 74 75 76 77 78 79 80 81 82 83 84 85 86 87 | <?phpnamespace Database\Seeders;use Illuminate\Database\Console\Seeds\WithoutModelEvents;use Illuminate\Database\Seeder;use App\Models\User;class UserSeeder extends Seeder{ /** * Run the database seeds. */ public function run(): void { $users = [ [ 'name' => 'Masud Alam', 'email' => 'masud@example.com', 'email_verified_at' => null, 'phone' => '+1 555-1234', 'age' => 30.5, 'gender' => 'Male' ], [ 'name' => 'Sahana Akter', 'email' => 'sahana@example.com', 'email_verified_at' => null, 'phone' => '+1 555-5678', 'age' => 25.2, 'gender' => 'Female' ], [ 'name' => 'Sheren akter', 'email' => 'sheren@example.com', 'email_verified_at' => null, 'phone' => '+1 555-5678', 'age' => 25.2, 'gender' => 'Female' ], [ 'name' => 'Maryam Binte Masud', 'email' => 'maryam@example.com', 'email_verified_at' => null, 'phone' => '+1 555-5678', 'age' => 25.2, 'gender' => 'Female' ], [ 'name' => 'Mamnun Bin Masud', 'email' => 'mamnun@example.com', 'email_verified_at' => null, 'phone' => '+1 555-1234', 'age' => 8.5, 'gender' => 'Male' ], [ 'name' => 'Muhib Bin Masud', 'email' => 'muhib@example.com', 'email_verified_at' => null, 'phone' => '+1 555-5478', 'age' => 5.2, 'gender' => 'Male' ], [ 'name' => 'Mahmud Bin Masud', 'email' => 'mahmud@example.com', 'email_verified_at' => null, 'phone' => '+1 555-1134', 'age' => 3.5, 'gender' => 'Male' ], [ 'name' => 'Sohel Alam', 'email' => 'sohel@example.com', 'email_verified_at' => null, 'phone' => '+1 555-1734', 'age' => 30.5, 'gender' => 'Male' ], ]; foreach ($users as $user) { User::create($user); } }} |
এখন আমরা chunking করা কালীন নিম্নোক্ত উপায়ে , আমাদের table কে update করব:
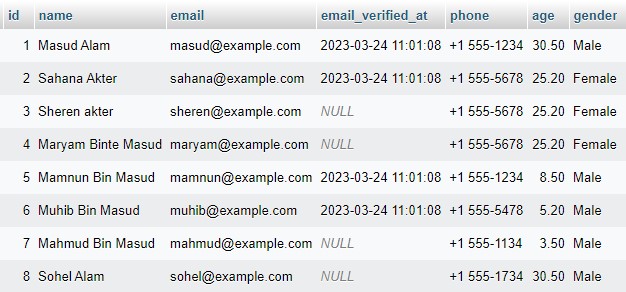
01 02 03 04 05 06 07 08 09 10 11 | use App\Models\User;Route::get('/update', function () { $users=User::whereNull('email_verified_at') ->orderBy('id')->chunk(2, function ($users) { foreach ($users as $user) { User::where('id', $user->id) ->update(['email_verified_at' => now()]); } });}); |
যেহেতু ‘chunk’ Method ‘limit’ এবং offset দুটোই ব্যবহার করে , আপনি লক্ষ্য করবেন , আপনার table এর প্রতি দুটি row বাদ দিয়ে row গুলো আপডেট করতেছে:
এখন যদি ‘chunk’ Method এর পরিবর্তে chunkById method টি ব্যবহার করেন। তাহলে এই সমস্যার মুখোমুখি হতে হবেনা। কেননা chunkById মেথড টি table এর primary key এবং শুধু limit সুবিধা ব্যবহার করে :
01 02 03 04 05 06 07 08 09 10 11 | use App\Models\User;Route::get('/update', function () { $users=User::whereNull('email_verified_at') ->orderBy('id')->chunkById(2, function ($users) { foreach ($users as $user) { User::where('id', $user->id) ->update(['email_verified_at' => now()]); } });}); |
Streaming Results Lazily
lazy Method
lazy method টি chunk method এর অনুরূপভাবে কাজ করে। পার্থক্য হচ্ছে “lazy method” এমন একটি method কে বোঝায় যা শুধুমাত্র তখনই execute হয় যখন এটি বাস্তবে প্রয়োজন হয়, এটি chunk method এর মতো immediately execute হয়না ।
1 2 3 4 5 6 | use App\Models\User;Route::get('/getval', function () { foreach (User::lazy(2) as $user) { echo $user->name,"<br>"; }}); |
lazyById() Method
lazyById method টি chunkById method এর অনুরূপভাবে কাজ করে। পার্থক্য হচ্ছে “lazyById method” এমন একটি method কে বোঝায় যা শুধুমাত্র তখনই execute হয় যখন এটি বাস্তবে প্রয়োজন হয়, এটি chunkById method এর মতো immediately execute হয়না ।
1 2 3 4 5 6 | use App\Models\User;Route::get('/getval', function () { foreach (User::lazyById(2) as $user) { echo $user->name,"<br>"; }}); |
Cursors
lazy method এর মতোই , cursor method টি আপনার অ্যাপ্লিকেশনের memory consumption উল্লেখযোগ্যভাবে হ্রাস করতে ব্যবহার করা যেতে পারে যখন কয়েক হাজার Eloquent model রেকর্ডের মাধ্যমে iterating করা হয়।
Laravel Eloquent-এ, একটি cursor হল একটি database cursor যা আপনাকে একবারে মেমরিতে লোড না করেই large amount data প্রসেস করার অনুমতি দেয়।
সাধারণত, যখন আপনি Eloquent ব্যবহার করে ডেটার জন্য query করেন, তখন সমস্ত মিলে যাওয়া রেকর্ড ডাটাবেস থেকে retrieve করা হয় এবং মেমরিতে লোড করা হয়। যাইহোক, বড় ডেটাসেটগুলির সাথে ডিল করার সময় এটি সমস্যাযুক্ত হতে পারে যা প্রচুর মেমরি গ্রাস করতে পারে এবং অ্যাপ্লিকেশনটিকে ধীর করে দিতে পারে।
cursors এর সাহায্যে, Eloquent ছোট খণ্ডে বা “পেজ” এ ডেটা retrieve করে এবং শুধুমাত্র একটি পেজ মেমরিতে লোড করে। এটি অত্যধিক মেমরি ব্যবহার না করে দক্ষতার সাথে বড় ডেটাসেটগুলি প্রক্রিয়া করা সম্ভব করে তোলে।
Eloquent এ cursor ব্যবহার করা সহজ। আপনি একটি প্রশ্নের জন্য একটি cursor retrieve করতে get method এর পরিবর্তে cursor method ব্যবহার করতে পারেন। উদাহরণ স্বরূপ:
1 2 3 4 5 6 7 8 9 | use App\Models\User;Route::get('/getval', function () { $users = User::where('gender', 'Male')->cursor(); foreach ($users as $user) { echo $user->name,"<br>"; }}); |
এছাড়াও cursor একটি Illuminate\Support\LazyCollection instance প্রদান করে। Lazy collection গুলি আপনাকে সাধারণ Laravel collections গুলিতে বিদ্যমান অনেকগুলি collection methods ব্যবহার করার অনুমতি দেয় যখন একটি সময়ে শুধুমাত্র একটি model মেমরিতে লোড করা হয়:
01 02 03 04 05 06 07 08 09 10 11 12 | use App\Models\User;Route::get('/getval', function () { $users = User::cursor()->filter(function (User $user) { return $user->gender == 'Female'; }); foreach ($users as $user) { echo $user->name,"<br>"; }}); |
Note:যদিও cursor method টি একটি regular query থেকে অনেক কম মেমরি ব্যবহার করে (কারণ এটি একই সময়ে মেমরিতে শুধুমাত্র একটি Eloquent model ধরে রেখে), তবে এতেও শেষ পর্যন্ত মেমরি ফুরিয়ে যেতে পারে। এটি পিএইচপি-এর PDO driver অভ্যন্তরীণভাবে সমস্ত raw query ফলাফলকে তার বাফারে ক্যাশ করার কারণে। আপনি যদি খুব বড় সংখ্যক Eloquent records নিয়ে কাজ করতে চান, তবে আপনি cursor এর পরিবর্তে lazy method ব্যবহার করার কথা বিবেচনা করা উচিৎ ।
Note:মনে রাখবেন যে cursor ব্যবহার করার সময়, cursor সম্পূর্ণরূপে প্রসেস করা বা স্পষ্টভাবে বন্ধ না হওয়া পর্যন্ত ডাটাবেস কানেকশন ওপেন থাকে। এটি ডাটাবেস রিসোর্স গুলির কর্মক্ষমতার উপর প্রভাব ফেলতে পারে, তাই cursor গুলিকে যুক্তিযুক্তভাবে এবং যত্ন সহকারে ব্যবহার করা গুরুত্বপূর্ণ।
Advanced Subqueries
Subquery Selects
Laravel Eloquent সাধারণ query গুলোর পাশাপাশি advanced subquery সমর্থন করে, যা আপনাকে একটি single query সম্পর্কিত টেবিল থেকে তথ্য পুল করতে দেয়।
উদাহরণস্বরূপ, ধরুন যে আমাদের কাছে flight গন্তব্যের একটি টেবিল এবং destinations ফ্লাইটের একটি টেবিল রয়েছে। flights table এ একটি arrival_time কলাম রয়েছে যা নির্দেশ করে কখন ফ্লাইটটি গন্তব্যে পৌঁছেছে।
query builder’s select এবং addSelect method বিদ্যমান subquery functionality ব্যবহার করে, আমরা একটি single query ব্যবহার করে সবকটি গন্তব্য এবং সেই গন্তব্যে যে ফ্লাইটটি সম্প্রতি পৌঁছেছে তার নাম নির্বাচন করতে পারি:
তার আগে চলুন নিচের মতো করে নতুন করে যথাক্রমে Flight এবং Destination Model,Migration File এবং Seeder তৈরি করি :
1 2 | php artisan make:model Flight -msphp artisan make:model Destination -ms |
এখন আপনার সদ্য তৈরি হওয়া File গুলোকে নিচের মতো করে আপডেট করুন :
Flight Model
01 02 03 04 05 06 07 08 09 10 11 | <?phpnamespace App\Models;use Illuminate\Database\Eloquent\Factories\HasFactory;use Illuminate\Database\Eloquent\Model;class Flight extends Model{ use HasFactory;} |
Destination Model
01 02 03 04 05 06 07 08 09 10 11 | <?phpnamespace App\Models;use Illuminate\Database\Eloquent\Factories\HasFactory;use Illuminate\Database\Eloquent\Model;class Destination extends Model{ use HasFactory;} |
destinations table Migration File
01 02 03 04 05 06 07 08 09 10 11 12 13 14 15 16 17 18 19 20 21 22 23 24 25 26 27 28 29 | <?phpuse Illuminate\Database\Migrations\Migration;use Illuminate\Database\Schema\Blueprint;use Illuminate\Support\Facades\Schema;return new class extends Migration{ /** * Run the migrations. */ public function up(): void { Schema::create('destinations', function (Blueprint $table) { $table->id(); $table->string('name'); $table->string('country'); $table->timestamps(); }); } /** * Reverse the migrations. */ public function down(): void { Schema::dropIfExists('destinations'); }}; |
flights table Migration File
01 02 03 04 05 06 07 08 09 10 11 12 13 14 15 16 17 18 19 20 21 22 23 24 25 26 27 28 29 30 31 32 | <?phpuse Illuminate\Database\Migrations\Migration;use Illuminate\Database\Schema\Blueprint;use Illuminate\Support\Facades\Schema;return new class extends Migration{ /** * Run the migrations. */ public function up(): void { Schema::create('flights', function (Blueprint $table) { $table->id(); $table->string('name'); $table->unsignedBigInteger('destination_id'); $table->foreign('destination_id')->references('id')->on('destinations')->onDelete('cascade'); $table->dateTime('departure_time'); $table->dateTime('arrival_time'); $table->timestamps(); }); } /** * Reverse the migrations. */ public function down(): void { Schema::dropIfExists('flights'); }}; |
Destinations Seeder File
01 02 03 04 05 06 07 08 09 10 11 12 13 14 15 16 17 18 19 20 21 22 23 24 25 26 27 28 29 30 31 32 33 34 35 36 37 38 | <?phpnamespace Database\Seeders;use Illuminate\Database\Console\Seeds\WithoutModelEvents;use Illuminate\Database\Seeder;use App\Models\Destination;class DestinationSeeder extends Seeder{ /** * Run the database seeds. */ public function run(): void { // Insert some sample destinations into the destinations table Destination::insert([ [ 'name' => 'New York', 'country' => 'United States', 'created_at' => now(), 'updated_at' => now(), ], [ 'name' => 'London', 'country' => 'United Kingdom', 'created_at' => now(), 'updated_at' => now(), ], [ 'name' => 'Paris', 'country' => 'France', 'created_at' => now(), 'updated_at' => now(), ], ]); }} |
flights Seeder File
01 02 03 04 05 06 07 08 09 10 11 12 13 14 15 16 17 18 19 20 21 22 23 24 25 26 27 28 29 30 31 32 33 34 | <?phpnamespace Database\Seeders;use Illuminate\Database\Console\Seeds\WithoutModelEvents;use Illuminate\Database\Seeder;use App\Models\Flight;class FlightSeeder extends Seeder{ /** * Run the database seeds. */ public function run(): void { // Create an array of flight names to choose from $flightNames = [ 'Delta', 'United', 'American', 'Southwest', 'JetBlue', 'Alaska', 'Frontier', 'Spirit' ]; // Create an array of destination IDs to choose from $destinationIds = [1, 2, 3]; // Generate 50 flights with random names, destination IDs, and departure/arrival times for ($i = 0; $i < 50; $i++) { Flight::create([ 'name' => $flightNames[array_rand($flightNames)], 'destination_id' => $destinationIds[array_rand($destinationIds)], 'departure_time' => now()->addHours(rand(1, 24)), 'arrival_time' => now()->addHours(rand(25, 48)), ]); } }} |
এবার নিম্নোক্ত কমান্ডের মাধ্যমে প্রথমে destinations এবং flights table দুটির স্ট্রাকচার তৈরি করে ফেলি :
1 2 | php artisan migrate --path=database/migrations/your_destinations_migration_file_name.phpphp artisan migrate --path=database/migrations/your_flights_migration_file_name.php |
একইভাবে নিম্নোক্ত কমান্ডের মাধ্যমে প্রথমে destinations এবং flights table দুটির seeder run করে ফেলি :
1 2 | php artisan db:seed --class=DestinationSeederphp artisan db:seed --class=FlightSeeder |
এখন Laravel Eloquent Sub Query ব্যবহার করে আপনি এটি নিম্নোক্ত উপায়ে করতে পারেন:
01 02 03 04 05 06 07 08 09 10 11 12 13 14 15 | use App\Models\Destination;use App\Models\Flight; Route::get('/flights', function () { $flights=Destination::addSelect(['last_flight' => Flight::select('name') ->whereColumn('destination_id', 'destinations.id') ->orderByDesc('arrival_time') ->limit(1)])->get();foreach($flights as $flight){ echo $flight->last_flight,"<br>";} }); |
মুলত এটি আপনার জন্য নিম্নোক্ত SQL তৈরি করবে :
1 2 3 | select `destinations`.*, (select `name` from `flights` where `destination_id` = `destinations`.`id` order by `arrival_time` desc limit 1) as `last_flight` from `destinations` |
Retrieving Single Models
এছাড়াও প্রদত্ত query এর সাথে মিলে যাওয়া সমস্ত রেকর্ড retrieve করার পাশাপাশি, আপনি find, first, বা firstWhere method ব্যবহার করে single রেকর্ডও retrieve করতে পারেন। মডেলের একটি collection return করার পরিবর্তে, এই methods গুলি একটি single model instance প্রদান করে:
01 02 03 04 05 06 07 08 09 10 | use App\Models\Flight; // Retrieve a model by its primary key...$flight = Flight::find(1); //select * from `flights` where `flights`.`id` = 2 limit 1 // Retrieve the first model matching the query constraints...$flight = Flight::where('active', 1)->first(); //select * from `flights` where `name` = 'alaska' limit 1 // Alternative to retrieving the first model matching the query constraints...$flight = $flight = Flight::firstWhere('arrival_time', '2023-03-26 23:14:58'); //select * from `flights` where `arrival_time` = '2023-03-26 23:14:58' limit 1 |
findOr Method
FindOr method টি তার primary key দ্বারা একটি model instance retrieve করতে বা মডেলটি না পাওয়া গেলে একটি ডিফল্ট মান (যেমন একটি closure) return দিতে ব্যবহৃত হয়। আপনি কিভাবে একটি লারাভেলে closure করার সাথে findOr method টি ব্যবহার করতে পারেন তার একটি উদাহরণ এখানে:
01 02 03 04 05 06 07 08 09 10 | use App\Models\Flight; Route::get('/flight/{id}', function ($id) { $flight = Flight::findOr($id, function () { abort(404, 'Flight not found.'); }); // Do something with the $flight model instance echo $flight->name;}); |
firstOr Method
firstOr method টি একটি প্রদত্ত query সাথে মিলে যাওয়া first model টি পুনরুদ্ধার করতে বা কোন মডেল না পাওয়া গেলে একটি ডিফল্ট মান (যেমন একটি closure) return দিতে ব্যবহৃত হয়। লারাভেলে closure করার সাথে আপনি কীভাবে firstOr method ব্যবহার করতে পারেন তার একটি উদাহরণ এখানে
01 02 03 04 05 06 07 08 09 10 | use App\Models\Flight; Route::get('/flight', function () { $flight = Flight::where('name', '=', 'Frontier')->firstOr(function () { abort(404, 'No flights matching the query were found.'); }); // Do something with the $flight model instance echo $flight->arrival_time;}); |
Not Found Exceptions
findOrFail() Method
FindOrFail method টি primary key দ্বারা একটি model instance retrieve করতে ব্যবহৃত হয়, অথবা যদি কোন ম্যাচিং মডেল পাওয়া না যায় তবে একটি ModelNotFoundException throw করা হয়। আপনি কিভাবে একটি Laravel এ findOrFail method ব্যবহার করতে পারেন তার একটি উদাহরণ এখানে:
01 02 03 04 05 06 07 08 09 10 | use App\Models\Flight; Route::get('/flight/{id}', function ($id) { try { $flight = Flight::findOrFail($id); } catch (Illuminate\Database\Eloquent\ModelNotFoundException $exception) { abort(404, 'Flight not found.'); } echo $flight->arrival_time;}); |
firstOrFail() Method
Laravel-এ firstOrFail() method টি একটি constraints সেটের সাথে মিলে যাওয়া প্রথম model instance retrieve করতে বা ModelNotFoundException throw করতে ব্যবহার করা হয় যদি কোন মিলিত মডেল পাওয়া না যায়। আপনি কীভাবে এটি ব্যবহার করতে পারেন তার একটি উদাহরণ এখানে দেওয়া হল:
01 02 03 04 05 06 07 08 09 10 11 12 | use App\Models\Flight; Route::get('/flight', function () { try { // Find the first flight with more than 3 legs $flight = Flight::where('arrival_time', '>', '2023-03-25 18:14:58')->firstOrFail(); } catch (Illuminate\Database\Eloquent\ModelNotFoundException $e) { // Handle the case where no flights are found return response()->json(['error' => 'No flights found'], 404); } echo $flight->arrival_time;}); |
FindOrFail এবং firstOrFail Method দুটির মধ্যে পার্থক্য
Laravel Eloquent-এ, findOrFail() এবং firstOrFail() উভয় methods ই ডাটাবেস থেকে model instance retrieve করতে ব্যবহার করা হয়, কিন্তু তারা কিছুটা ভিন্নভাবে আচরণ করে:
- findOrFail(): এই method টি তার primary key এর মান দ্বারা একটি model instance পুনরুদ্ধার করতে ব্যবহৃত হয়। model instance পাওয়া না গেলে, একটি ModelNotFoundException থ্রো করা হয়। এই method টি তখনি কার্যকর যখন আপনি নিশ্চিত হন যে আপনি যে মডেলের instance টি খুঁজছেন সেটি বিদ্যমান রয়েছে এবং যদি এটি না থাকে তবে আপনি exception টি handle করতে চান।
- firstOrFail(): এই method টি constraint সেটের সাথে মিলে যাওয়া প্রথম মডেলের instance retrieve করতে ব্যবহৃত হয়। যদি কোন মিলিত মডেল instance পাওয়া না যায়, একটি ModelNotFoundException নিক্ষেপ করা হয়। এই method টি তখনি উপযোগী যখন আপনি একটি নির্দিষ্ট মডেলের instance খুঁজছেন যা নির্দিষ্ট মানদণ্ড পূরণ করে, এবং যদি এটি বিদ্যমান না থাকে তবে আপনি ব্যতিক্রমটি পরিচালনা করতে চান।
সংক্ষেপে, findOrFail() এর primary key value দ্বারা একটি model instance retrieve করতে ব্যবহৃত হয়, যখন firstOrFail() constraintsসেটের সাথে মিলে যাওয়া প্রথম মডেলের instance retrieve করতে ব্যবহৃত হয়।
Retrieving Or Creating Models
firstOrCreate() and firstOrNew() method
Laravel Eloquent-এ firstOrCreate() method টি attributes গুলির একটি সেটের সাথে মিলে যাওয়া প্রথম মডেলের instance টি retrieve করতে বা প্রদত্ত attributes গুলির সাথে একটি নতুন মডেল instance তৈরি করতে ব্যবহার করা হয় যদি কোনও matching Model পাওয়া না যায়।
অন্যদিকে firstOrNew() Method অনেকটা firstOrCreate() Method এর অনুরূপ, পার্থক্য হচ্ছে এটি কোনো matching model না পাওয়া গেলে একটি নতুন Model instance তৈরি করার পরিবর্তে, এটি প্রদত্ত attributes গুলির সাথে একটি নতুন মডেল instance প্রদান করে:
01 02 03 04 05 06 07 08 09 10 11 12 13 14 15 16 17 18 19 20 21 22 23 | use App\Models\Flight; // Retrieve flight by name or create it if it doesn't exist...$flight = Flight::firstOrCreate([ 'name' => 'London to Paris']); // Retrieve flight by name or create it with the name, delayed, and arrival_time attributes...$flight = Flight::firstOrCreate( ['name' => 'London to Paris'], ['delayed' => 1, 'arrival_time' => '11:30']); // Retrieve flight by name or instantiate a new Flight instance...$flight = Flight::firstOrNew([ 'name' => 'London to Paris']); // Retrieve flight by name or instantiate with the name, delayed, and arrival_time attributes...$flight = Flight::firstOrNew( ['name' => 'Tokyo to Sydney'], ['delayed' => 1, 'arrival_time' => '11:30']); |
Aggregates
Laravel Eloquent এ count, max, min, avg, এবং sum নামে কিছু aggregate Method এর সুবিধা দেয়, নিচে এগুলোর কিছু উদাহরণ দেওয়া হলো :
01 02 03 04 05 06 07 08 09 10 11 | use App\Models\User;Route::get('/getval', function () { $totalUsers = User::count(); $averageAge=User::avg('age'); $maxAge=User::max('age'); $minAge=User::min('age'); echo "Total No. of Users: " . $totalUsers,"<br>"; echo "Average Age is: ", $averageAge,"<br>"; echo "Minimum Age is :", $minAge,"<br>"; echo "Maximum Age is :", $maxAge,"<br>";}); |
Masud Alam
আমি মাসুদ আলম, বাংলাদেশের ৩৬ তম Zend Certified Engineer । ২০০৯ সালে কম্পিউটার সাইন্স থেকে বেচেলর ডিগ্রী অর্জন করি। দীর্ঘ ১৫ বছর আমি Winux Soft, SSL Wireless, IBCS-PRIMAX, Max Group, Canadian International Development Agency (CIDA), Care Bangladesh, World Vision, Hellen Keller, Amarbebsha Ltd সহ বিভিন্ন দেশি বিদেশী কোম্পানিতে ডেটা সাইন্স, মেশিন লার্নিং, বিগ ডেটা, ওয়েব ডেভেলপমেন্ট এবং সফটওয়্যার ডেভেলপমেন্ট এর উপর বিভিন্ন লিডিং পজিশন এ চাকরি এবং প্রজেক্ট লিড করি। এছাড়াও বাংলাদেশের ১৮৫ জন জেন্ড সার্টিফাইড ইঞ্জিনিয়ার এর মধ্যে ১২০ এরও অধিক ছাত্র আমার হাতে জেন্ড সার্টিফাইড ইঞ্জিনিয়ার হয়েছেন। বর্তমানে w3programmers ট্রেনিং ইনস্টিটিউট এ PHP এর উপর Professional এবং Advance Zend Certified PHP -8.2 Engineering, Laravel Mastering Course with ReactJS, Python Beginning To Advance with Blockchain, Machine Learning and Data Science, Professional WordPress Plugin Development Beginning to Advance কোর্স করাই। আর অবসর সময়ে w3programmers.com এ ওয়েব টেকনোলজি নিয়ে লেখালেখি করি।