Laravel Broadcasting
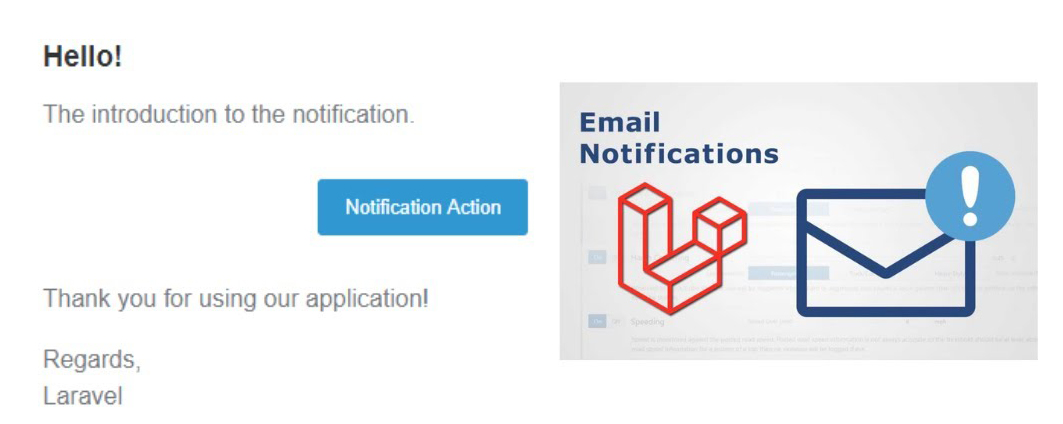
Send E-Mail Notification Using Laravel Mail Channel
Laravel Framework এ Laravel Mail channel হল একটি built-in notification channel যা আপনাকে ইমেলের মাধ্যমে notification গুলো পাঠাতে দেয়। এটি একটি লারাভেলের mail service provider বিভিন্ন ইমেল ড্রাইভারকে সাপোর্ট করে, যেমন SMTP, Mailgun, SendGrid এবং আরও অনেক কিছু।
আপনি যখন একটি নোটিফিকেশনের জন্য Laravel Mail Channel ডিফাইন করেন, তখন Laravel আপনার notification class এ toMail method টি ব্যবহার করবে notification এ একটি ইমেল রিপ্রেজেন্ট তৈরি করতে। আপনি এই মেথডের মধ্যে ইমেলের সাবজেক্ট , কনটেন্ট এবং অন্যান্য দিকগুলি কাস্টমাইজ করতে পারেন।
Laravel Mail Channel আপনার লারাভেল অ্যাপ্লিকেশনে ইউজারদের email notifications পাঠানোর একটি সুবিধাজনক উপায় প্রদান করে। এটি ইমেল পাঠানোর জটিলতা দূর করে এবং লারাভেলের নোটিফিকেশন সিস্টেমের সাথে নির্বিঘ্নে ইন্টিগ্রেট করে। এই চ্যানেলটি ব্যবহার করে, আপনি account activation, password reset, order confirmation এবং আরও অনেক কিছুর জন্য email notification এর মাধ্যমে সহজেই আপনার ইউজারদের অবহিত করতে পারেন।
Laravel Framework এ Notifications গুলি দুটি উপায়ে পাঠানো যেতে পারে, একটি হচ্ছে Notifiable trait এর notify method ব্যবহার করে আর অন্যটি হচ্ছে Notification facade
আজকে আমরা একটি সাধারণ BirthdayWish notification তৈরি করব এবং ইউজারদের তার জন্মদিনে সেটি পাঠাব। আর এর জন্য আমরা Notifiable trait এর notify method ব্যবহার করে এবং Notification facade দুটিই পদ্ধতিই ব্যবহার করব। সুতরাং, চলুন এই সহজ উদাহরণটি সম্পন্ন করতে নিম্নলিখিত ধাপগুলো অনুসরণ করি।
ধাপ ১: Install Laravel
আপনার যদি ইতিমধ্যে লারাভেল ইনস্টল থাকে তাহলে এই ধাপের প্রয়োজন নেই; আর যদি ,আপনি laravel ইনস্টল না করে থাকেন, তাহলে আপনি নতুন করে লারাভেল ইনস্টল করার জন্য নিচের কমান্ডটি চালাতে পারেন:
1 | composer create-project laravel/laravel notifications |
ধাপ ২: Update create_users_table.php Migration File
এবার, আমরা users টেবিলে নতুন কলাম birthdate যোগ করার জন্য বিদ্যমান create_users_table মাইগ্রেশন ফাইল কে নিচের মতো করে আপডেট করব:
01 02 03 04 05 06 07 08 09 10 11 12 13 14 15 16 17 18 19 20 21 22 23 24 25 26 27 28 29 30 31 32 33 | <?phpuse Illuminate\Database\Migrations\Migration;use Illuminate\Database\Schema\Blueprint;use Illuminate\Support\Facades\Schema;return new class extends Migration{ /** * Run the migrations. */ public function up(): void { Schema::create('users', function (Blueprint $table) { $table->id(); $table->string('name'); $table->string('email')->unique(); $table->timestamp('email_verified_at')->nullable(); $table->string('password'); $table->date('birthdate')->nullable(); $table->rememberToken(); $table->timestamps(); }); } /** * Reverse the migrations. */ public function down(): void { Schema::dropIfExists('users'); }}; |
এবার নিম্নোক্ত কমান্ডের মাধ্যমে আপনার Migration রান করুন :
1 | php artisan migrate |
ধাপ ৩: Create UsersTableSeeder.php Seed File
এবার আমরা নিম্নোক্ত আর্টিসান কমান্ডের মাধ্যমে UsersTableSeeder.php নামে একটি seed File তৈরি করব :
1 | php artisan make:seed UsersTableSeeder |
এবার সদ্য তৈরি হওয়া database\seeders\UsersTableSeeder.php ফাইলকে নিচের মতো করে আপডেট করে নিব :
01 02 03 04 05 06 07 08 09 10 11 12 13 14 15 16 17 18 19 20 21 22 23 24 25 26 27 28 29 30 31 32 33 34 35 36 37 38 39 40 41 42 | <?phpnamespace Database\Seeders;use Illuminate\Database\Console\Seeds\WithoutModelEvents;use Illuminate\Database\Seeder;use Illuminate\Support\Facades\DB;use Illuminate\Support\Facades\Hash;use Illuminate\Support\Str;class UsersTableSeeder extends Seeder{ /** * Run the database seeds. */ public function run(): void { DB::table('users')->insert([ [ 'name' => 'John Doe', 'email' => 'WriteHereAValidGmailId', 'email_verified_at' => now(), 'password' => Hash::make('password'), 'birthdate' => '1990-01-01', 'remember_token' => Str::random(10), 'created_at' => now(), 'updated_at' => now(), ], [ 'name' => 'Jane Smith', 'email' => 'WriteHereAValidGmailId', 'email_verified_at' => now(), 'password' => Hash::make('password'), 'birthdate' => '1995-05-10', 'remember_token' => Str::random(10), 'created_at' => now(), 'updated_at' => now(), ], // Add more dummy data if needed ]); }} |
নোট: উপরোক্ত email column এ একটি valid gmail id ব্যবহার করুন :
এবার নিম্নোক্ত কমান্ডের মাধ্যমে আপনার Seed File টি রান করুন :
1 | php artisan db:seed --class=UsersTableSeeder |
৪. Use Notifiable trait and birthday Column in your Model
যেহেতু আমরা Notifiable trait এবং Notification Facade দুটি পদ্ধতিই ব্যবহার করব। তাই প্রথমে আমরা আমাদের বিদ্যমান User Model এ নিচের মতো করে Notifiable trait ব্যবহার করব এবং যেহেতু আমরা ‘birthdate’ নামক একটি অতিরিক্ত column তৈরি করেছি। তাই এই অতিরিক্ত ‘birthdate’ column টিকে আমাদের মডেলের $fillable property এর array তে যুক্ত করে নিব:
01 02 03 04 05 06 07 08 09 10 11 12 13 14 15 16 17 18 19 20 21 22 23 24 25 26 27 28 29 30 31 32 33 34 35 36 37 38 39 40 41 42 43 44 45 46 | <?phpnamespace App\Models;// use Illuminate\Contracts\Auth\MustVerifyEmail;use Illuminate\Database\Eloquent\Factories\HasFactory;use Illuminate\Foundation\Auth\User as Authenticatable;use Illuminate\Notifications\Notifiable;use Laravel\Sanctum\HasApiTokens;class User extends Authenticatable{ use HasApiTokens, HasFactory, Notifiable; /** * The attributes that are mass assignable. * * @var array<int, string> */ protected $fillable = [ 'name', 'email', 'password', 'birthdate' ]; /** * The attributes that should be hidden for serialization. * * @var array<int, string> */ protected $hidden = [ 'password', 'remember_token', ]; /** * The attributes that should be cast. * * @var array<string, string> */ protected $casts = [ 'email_verified_at' => 'datetime', 'password' => 'hashed', ];} |
ধাপ ৫: Create Notification Class
এবার আমরা নিম্নোক্ত Artisan Command ব্যবহার করে BirthdayWish নামে একটি notification class তৈরি করব:
1 | php artisan make:notification BirthdayWish |
এবার এই সদ্য তৈরি হওয়া app/Notifications/BirthdayWish.php Notification class নিয়ে আলোচনা করা যাক :
Specifying Delivery Channels
প্রতিটি notification ক্লাসের একটি via method রয়েছে যা নির্ধারণ করে কোন চ্যানেলের মাধ্যমে notification গুলো ডেলিভারি করা হবে। লারাভেল ফ্রেমওয়ার্ক এ mail, database, broadcast, vonage, এবং slack চ্যানেলসহ আরো বহু মাধ্যমে notification গুলো পাঠানো যায়।
আপনি যদি টেলিগ্রাম বা পুশারের মতো অন্যান্য ডেলিভারি চ্যানেল ব্যবহার করতে চান, তাহলে কমিউনিটি চালিত লারাভেল নোটিফিকেশন চ্যানেল ওয়েবসাইট দেখুন।
এবার আমরা সদ্য তৈরি হওয়া app/Notifications/BirthdayWish.php ফাইলে নিচের মতো করে আপডেট করে নিবো:
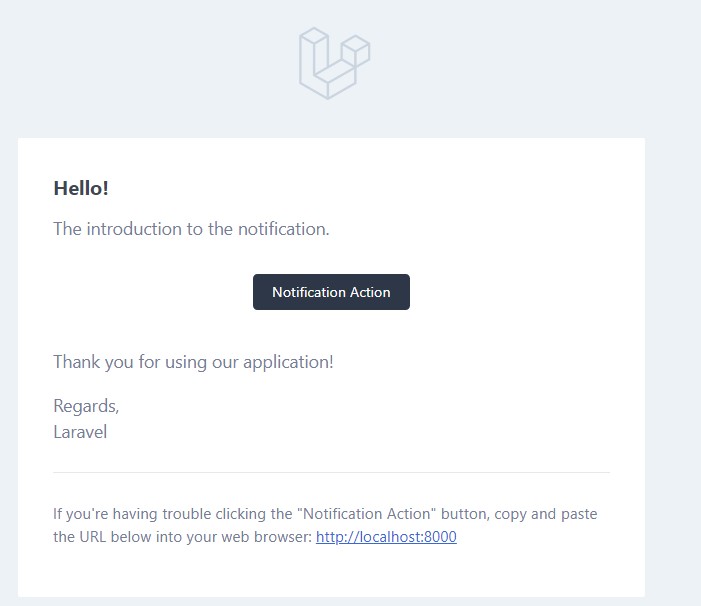
01 02 03 04 05 06 07 08 09 10 11 12 13 14 15 16 17 18 19 20 21 22 23 24 25 26 27 28 29 30 31 32 33 34 35 36 37 38 39 40 41 42 43 44 45 46 47 48 49 50 51 52 53 54 55 | <?phpnamespace App\Notifications;use Illuminate\Bus\Queueable;use Illuminate\Contracts\Queue\ShouldQueue;use Illuminate\Notifications\Messages\MailMessage;use Illuminate\Notifications\Notification;class BirthdayWish extends Notification{ use Queueable; private $messages; /** * Create a new notification instance. */ public function __construct($messages) { $this->messages=$messages; } /** * Get the notification's delivery channels. * * @return array<int, string> */ public function via(object $notifiable): array { return ['mail']; } /** * Get the mail representation of the notification. */ public function toMail(object $notifiable): MailMessage { return (new MailMessage) ->line('The introduction to the notification.') ->action('Notification Action', url('/')) ->line('Thank you for using our application!'); } /** * Get the array representation of the notification. * * @return array<string, mixed> */ public function toArray(object $notifiable): array { return [ // ]; }} |
via method একটি $notifiable instance পায়, যেটি যে ক্লাসে notification পাঠানো হচ্ছে তার একটি instance হবে। কোন চ্যানেলে notification delivery করা হবে তা নির্ধারণ করতে আপনি $notifiable ব্যবহার করতে পারেন:
1 2 3 4 5 6 7 8 9 | /** * Get the notification's delivery channels. * * @return array<int, string> */public function via(object $notifiable): array{ return $notifiable->prefers_sms ? ['vonage'] : ['mail', 'database'];} |
ধাপ ৬: Create Gmail App Password
আর যেহেতু পুরো বিষয়টা আমরা localhost এ check করব , তাই আমরা আপাতত google mail ব্যবহার করব। আর এর জন্য আমরা নিম্নোক্ত উপায়ে আমাদের Gmail Account এর বিপরীতে একটি App Password তৈরি করব :
- Go to your Google Account.
- Select Security.
- Under “Signing in to Google,” select 2-Step Verification.
- At the bottom of the page, select App passwords.
- Enter a name that helps you remember where you’ll use the app password.
- Select Generate.
- To enter the app password, follow the instructions on your screen. The app password is the 16-character code that generates on your device.
- Select Done.
ধাপ ৭: Add Gmail Configuration to .env File
এবার, আমরা যেই gmail id এর বিপরীতে app password তৈরি করেছি সেটি সহ mail driver, mail host, mail port, mail username, mail password কে .env কনফিগারেশন ফাইলে যোগ করতে হবে যাতে ল্যারাভেল ইমেল পাঠানোর জন্য সেই sender configuration ব্যবহার করতে পারে:
1 2 3 4 5 6 7 8 | MAIL_MAILER=smtpMAIL_HOST=smtp.gmail.comMAIL_PORT=465MAIL_USERNAME=masud.eden@gmail.comMAIL_PASSWORD=WriteHereYourGmailAppPasswordMAIL_ENCRYPTION=tlsMAIL_FROM_ADDRESS="masud.eden@gmail.com"MAIL_FROM_NAME="${APP_NAME}" |
ধাপ ৮: Create Route
এই ধাপে আমাদের একজন ইউজারকে notification পাঠানোর জন্য routes তৈরি করতে হবে। তাই আপনার “routes/web.php” ফাইলটি খুলুন এবং নিম্নলিখিত route যোগ করুন।
01 02 03 04 05 06 07 08 09 10 11 12 13 14 15 16 17 18 19 | <?phpuse Illuminate\Support\Facades\Route;/*|--------------------------------------------------------------------------| Web Routes|--------------------------------------------------------------------------|| Here is where you can register web routes for your application. These| routes are loaded by the RouteServiceProvider and all of them will| be assigned to the "web" middleware group. Make something great!|*/use App\Http\Controllers\UserController;Route::get('notify-user', [UserController::class, 'index']); |
ধাপ ৯: Create Controller
এবার আমরা নিম্নোক্ত আর্টিসান কমান্ডের মাধ্যমে UserController নাম একটি Controller তৈরি করব :
1 | php artisan make:controller UserController |
ধাপ ১০: Update your Controller with using Notifiable trait
এবার সদ্য তৈরি হওয়া app\Http\Controllers\UserController.php ফাইলকে নিচের মতো করে আপডেট করে নিন, একইসাথে Model এ ব্যবহৃত Notifiable trait এর notify method টি ব্যবহার করুন :
01 02 03 04 05 06 07 08 09 10 11 12 13 14 15 16 17 18 19 20 21 22 | <?phpnamespace App\Http\Controllers;use Illuminate\Http\Request;use App\Models\User;use App\Notifications\BirthdayWish;class UserController extends Controller{ public function index(Request $request) { $user = User::find(1); $messages["hi"] = "Hey, Happy Birthday {$user->name}"; $messages["wish"] = "On behalf of the entire company I wish you a very happy birthday and send you my best wishes for much happiness in your life."; $user->notify(new BirthdayWish($messages)); dd('Done'); }} |
আর আপনি যদি Notification facade ব্যবহার করে Notification পাঠাতে চান, তাহলে আপনার Controller টি হবে এনিম্নরুপঃ
01 02 03 04 05 06 07 08 09 10 11 12 13 14 15 16 17 18 19 20 21 22 23 24 | <?phpnamespace App\Http\Controllers;use Illuminate\Http\Request;use App\Models\User;use App\Notifications\BirthdayWish;use Illuminate\Support\Facades\Notification;class UserController extends Controller{ public function index(Request $request) { $user = User::find(1); $messages["hi"] = "Hey, Happy Birthday {$user->name}"; $messages["wish"] = "On behalf of the entire company I wish you a very happy birthday and send you my best wishes for much happiness in your life."; //$user->notify(new BirthdayWish($messages)); Notification::send($user, new BirthdayWish($messages)); dd('Done'); }} |
এছাড়াও আপনি sendNow method ব্যবহার করে immediately (অবিলম্বে) আপনার notifications পাঠাতে পারেন। এই method টি অবিলম্বে notification পাঠাবে এমনকি যদি notification টি ShouldQueue interface implements অর্থাৎ প্রয়োগ করাও থাকে:
01 02 03 04 05 06 07 08 09 10 11 12 13 14 15 16 17 18 19 20 21 22 23 24 25 | <?phpnamespace App\Http\Controllers;use Illuminate\Http\Request;use App\Models\User;use App\Notifications\BirthdayWish;use Illuminate\Support\Facades\Notification;class UserController extends Controller{ public function index(Request $request) { $user = User::find(1); $messages["hi"] = "Hey, Happy Birthday {$user->name}"; $messages["wish"] = "On behalf of the entire company I wish you a very happy birthday and send you my best wishes for much happiness in your life."; //$user->notify(new BirthdayWish($messages)); //Notification::send($user, new BirthdayWish($messages)); Notification::sendNow($user, new BirthdayWish($messages)); dd('Done'); }} |
মোটামোটি সবগুলো প্রয়োজনীয় ধাপ সম্পন্ন হয়েছে, এখন আপনি নিম্নোক্ত আর্টিসান কমান্ড এর মাধ্যমে আপনার লারাভেল প্রজেক্ট রান করুন :
1 | php artisan serve |
এখন, আপনার ওয়েব ব্রাউজারে যান, প্রদত্ত URL টাইপ করুন এবং প্রজেক্টের আউটপুট দেখুন:
http://localhost:8000/notify-user
Masud Alam
আমি মাসুদ আলম, বাংলাদেশের ৩৬ তম Zend Certified Engineer । ২০০৯ সালে কম্পিউটার সাইন্স থেকে বেচেলর ডিগ্রী অর্জন করি। দীর্ঘ ১৫ বছর আমি Winux Soft, SSL Wireless, IBCS-PRIMAX, Max Group, Canadian International Development Agency (CIDA), Care Bangladesh, World Vision, Hellen Keller, Amarbebsha Ltd সহ বিভিন্ন দেশি বিদেশী কোম্পানিতে ডেটা সাইন্স, মেশিন লার্নিং, বিগ ডেটা, ওয়েব ডেভেলপমেন্ট এবং সফটওয়্যার ডেভেলপমেন্ট এর উপর বিভিন্ন লিডিং পজিশন এ চাকরি এবং প্রজেক্ট লিড করি। এছাড়াও বাংলাদেশের ১৮৫ জন জেন্ড সার্টিফাইড ইঞ্জিনিয়ার এর মধ্যে ১২০ এরও অধিক ছাত্র আমার হাতে জেন্ড সার্টিফাইড ইঞ্জিনিয়ার হয়েছেন। বর্তমানে w3programmers ট্রেনিং ইনস্টিটিউট এ PHP এর উপর Professional এবং Advance Zend Certified PHP -8.2 Engineering, Laravel Mastering Course with ReactJS, Python Beginning To Advance with Blockchain, Machine Learning and Data Science, Professional WordPress Plugin Development Beginning to Advance কোর্স করাই। আর অবসর সময়ে w3programmers.com এ ওয়েব টেকনোলজি নিয়ে লেখালেখি করি।